Last updated on October 4th, 2026 at 11:46 am
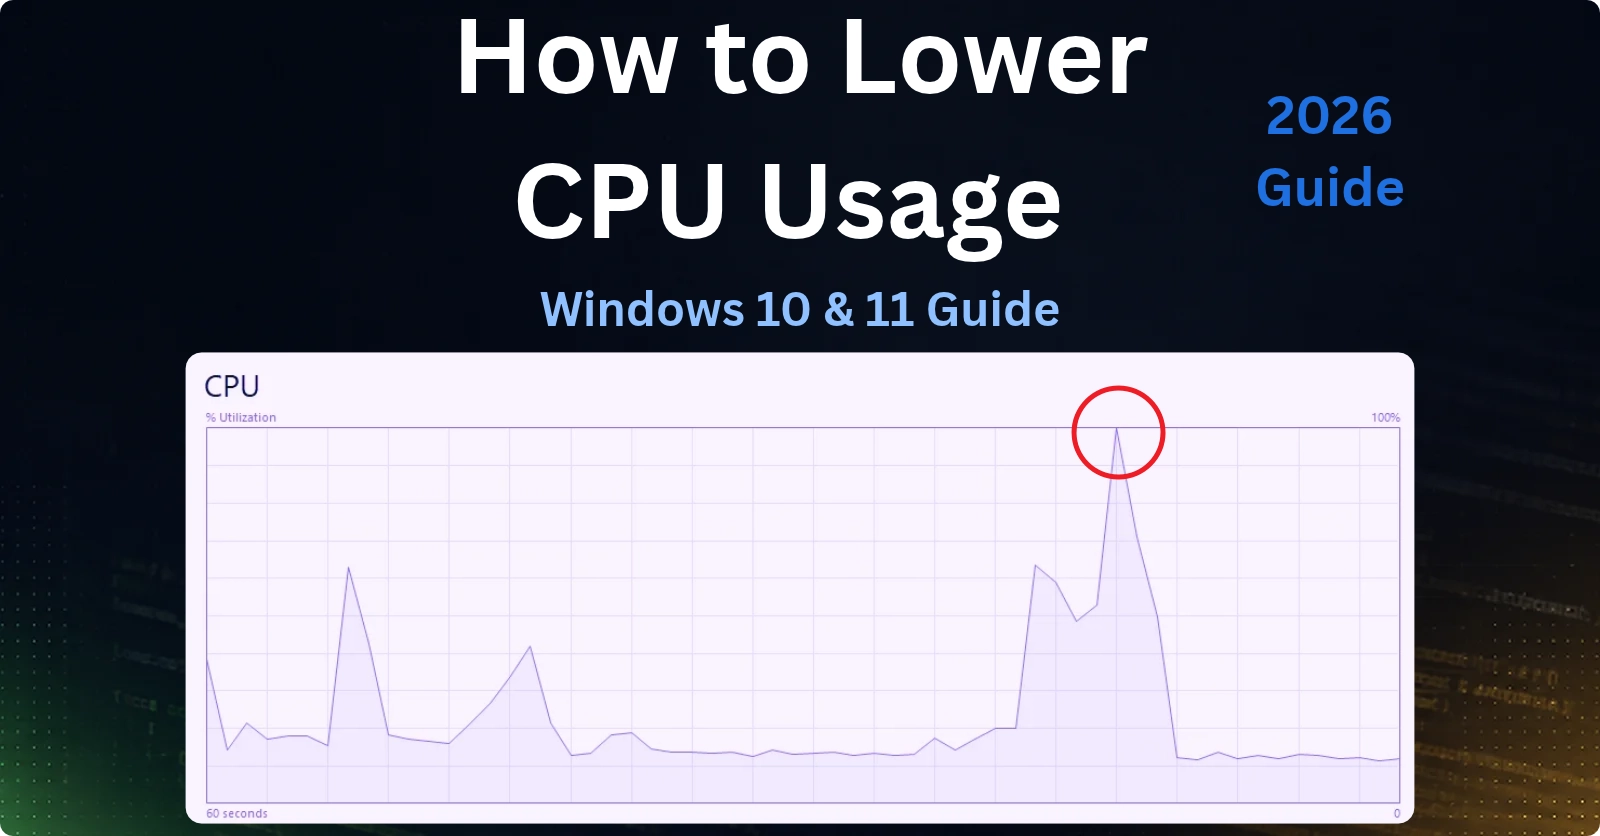
If you’re trying to figure out how to lower CPU usage on your PC, the fan noise and the lag are usually the easy part to notice, the hard part is finding out which process is actually causing it. CPU usage that sits high even when you’re not doing anything, or spikes the moment you open one specific app, almost always traces back to one identifiable cause rather than a vague “my computer is slow” problem. That’s also why knowing how to reduce CPU usage starts with finding the cause first, not with changing settings at random.
It’s worth saying upfront: some high CPU usage is completely normal. Modern processors are designed to run safely at 100% during heavy tasks like gaming, video exports, or antivirus scans, and features like Intel Turbo Boost deliberately push clock speed higher for exactly that reason. The problem worth fixing is CPU usage that stays high with nothing demanding running, or a specific background process eating resources it has no reason to need.
I run automated test suites for a living, Selenium and Playwright runs going in the background for hours at a stretch, so unexplained CPU spikes aren’t just annoying for me, they directly slow down every test run and throw off timing-sensitive tests. When my own machine’s fan started spinning up for no obvious reason, I went through the exact same process I’d use to debug a flaky test: isolate the process, change one variable, confirm the fix actually holds before moving on. This guide is the result of that process.
Every fix below was tested on Windows 10 22H2, so the menu paths and settings match what’s on a current Windows 10 screen, and the Windows 11 steps are based on Microsoft’s own documentation and clearly marked. Windows 10 and Windows 11 handle some of this differently, most notably Task Manager’s Efficiency Mode, which only exists on Windows 11, so this guide calls out exactly where the two versions diverge instead of treating them as identical.
This guide starts with a quick diagnosis to match your exact symptom to the right fix, then works through causes from the fastest checks to the deeper system-level ones. Lowering CPU usage also has a real payoff beyond just quieter fans, less heat means better battery life on laptops and less long-term wear on the hardware.
Quick answer: Open Task Manager (Ctrl + Shift + Esc), click the CPU column header to sort by usage, and look at what’s actually at the top. If it’s a specific app or too many browser tabs, close what you don’t need. If it’s a process you need to keep running, on Windows 11 right-click it and choose Efficiency Mode instead of ending it outright. If nothing obvious stands out but usage stays high, the next most common causes are too many startup apps, a stuck background service, thermal throttling, or a pending Windows update. Keep reading for the full diagnosis and 21 fixes by symptom.
- How to Lower CPU Usage: Quick Diagnosis
- Fast fixes to try first
- Reduce your startup and background load
- Fix OS-specific and third-party background culprits
- Adjust performance and power settings
- Fix update and driver related high CPU usage
- Rule out malware and deeper system issues
- Power-user tools for deeper CPU diagnosis
- How to Lower CPU Usage in Windows 11
- How to Lower CPU Usage in Windows 10
- When lowering CPU usage isn't enough
- Frequently asked questions
- Bottom line
How to Lower CPU Usage: Quick Diagnosis
| What you’re seeing | Likely cause | Jump to |
|---|---|---|
| CPU usage is high all the time, even sitting idle | A background process stuck in a loop | Fixes 1-2 |
| CPU spikes only when you open one specific app | That app itself is the resource hog | Fixes 1, 4 |
| CPU usage climbs the more browser tabs you have open | Too many tabs or a heavy extension | Fix 3 |
| Fan runs loud and CPU stays high right after startup | Too many apps launching at sign-in | Fixes 5-6 |
svchost.exe or another system process is using high CPU | A Windows service misbehaving | Fixes 9, 16, 18 |
| A driver-bundled utility (Nvidia, Razer, audio software) is at the top of the list | Third-party background service | Fix 9 |
| High CPU usage specifically on Windows 11 | Widgets, Copilot, or search indexing running in the background | Fixes 7-8, and the Windows 11 section below |
| High CPU usage specifically on Windows 10 | Background telemetry, search indexing, or a stuck update | Fixes 7-8, 15, and the Windows 10 section below |
| CPU spikes right after a Windows update installed | Update-related bug | Fix 15 |
| High CPU usage plus unusually high temperatures and fan noise | Thermal throttling | Fixes 13, 17 |
| High CPU usage plus a process disguised under a system-sounding name | Possible malware, including cryptojacking | Fix 16 |
Confirm it in Task Manager
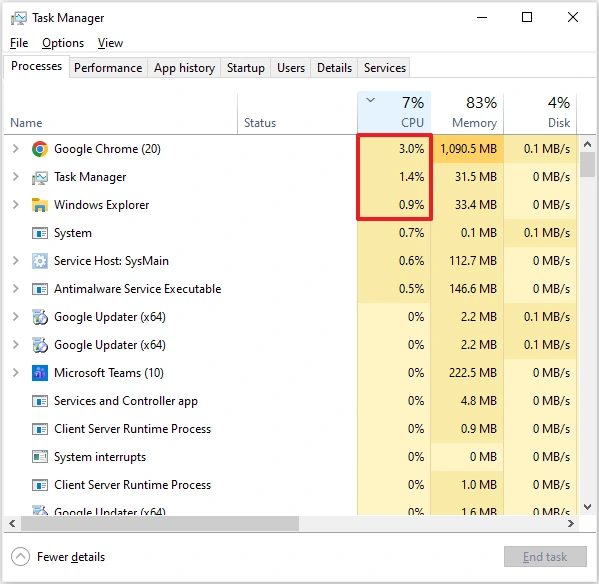
The question behind most of these searches is “why is my CPU usage so high?”, and Task Manager answers it faster than any guess. Before changing anything, open Task Manager (Ctrl + Shift + Esc), go to the Processes tab, and click the CPU column header to sort from highest to lowest. If Task Manager opens in its simplified view, click More details at the bottom first to reveal every background process, not just the apps you can see open.
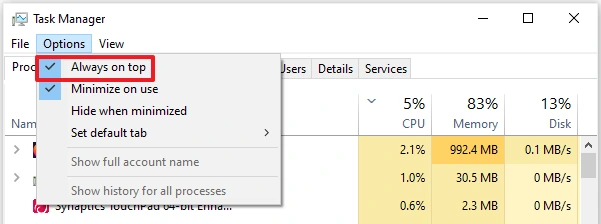
If you’re troubleshooting this while playing a full-screen game, Task Manager can get hidden behind it. Click Options in the menu bar and select Always on top so it stays visible, or drag it to a second monitor if you have one.
Once you can see the full list, watch it for 10-15 seconds. A process that spikes briefly and drops isn’t your problem, one that stays high is. It also helps to know what’s actually normal here: individual background Windows processes should typically sit at 0-1%, and everything combined should stay under 10% of your CPU while the system is idle. Seeing Runtime Broker or Windows Session Manager briefly appear on the list is usually nothing to worry about, these are legitimate Windows components. What you’re looking for is something that stays elevated for no clear reason, or a process you don’t recognize at all.
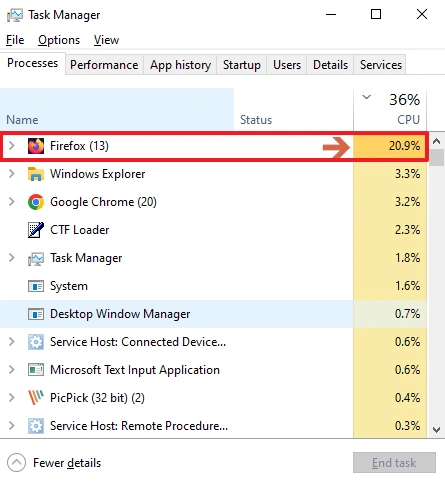
One important caution: don’t end explorer.exe or winlogon.exe unless you have a specific reason to. These handle your desktop, Start menu, and sign-in session, ending them can cause more disruption than the high CPU usage itself.
Fast fixes to try first
1. Sort Task Manager by CPU and identify the exact process
This sounds basic, but it’s the step most people skip, and skipping it is why generic advice like “just restart your PC” so often fails to actually solve anything.
- Press Ctrl + Shift + Esc to open Task Manager
- Click the Processes tab, and More details if needed
- Click the CPU column header once to sort by usage, highest first
- Watch it for 10-15 seconds to separate a real sustained hog from a brief spike
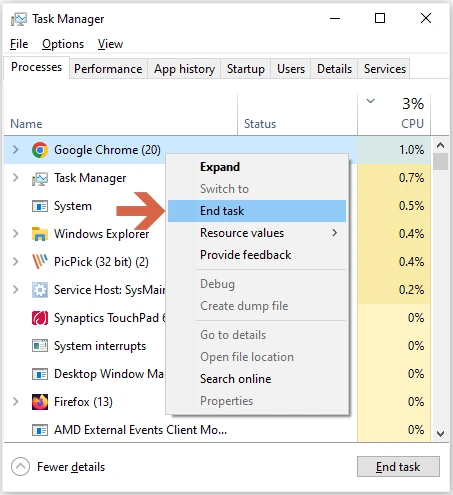
2. End the specific runaway process
Once you know which process it is, and you’ve confirmed it isn’t a protected system process, right-click it and select End task. If it’s a background app you don’t need, this is often the fastest fix. If it’s something you don’t recognize, don’t end it yet, check Fix 16 first to rule out malware before deciding.
- Right-click the high-CPU process in Task Manager’s Processes tab
- Select End task
- Watch the CPU percentage to confirm it actually drops
3. Close excess browser tabs and extensions
Browsers are one of the most common, and most overlooked, sources of high CPU usage, especially with several tabs open or a misbehaving extension running on every page you visit. This isn’t a hypothetical, disabling a single problematic ad-blocking extension has been enough on its own to bring CPU usage back to normal for some users.
- Check how many tabs your browser is using in Task Manager, browsers typically show as multiple entries or an expandable group
- Close tabs you’re not actively using
- Go into your browser’s extensions menu and disable them one at a time to isolate a culprit, particularly ad blockers, VPN extensions, or anything that scans every page you load
4. Windows 11 only: use Efficiency Mode instead of ending the process
If the process is something you actually need open, Microsoft’s Task Manager Efficiency Mode throttles its resource usage instead of closing it outright, which is often the better option for anything you don’t want to lose your place in.
- In Task Manager’s Processes tab, right-click the process
- Select Efficiency Mode
- Confirm when prompted, a leaf icon appears next to the process once it’s active
This option doesn’t exist on Windows 10, core Windows processes are also greyed out here since throttling them can cause instability.
Reduce your startup and background load
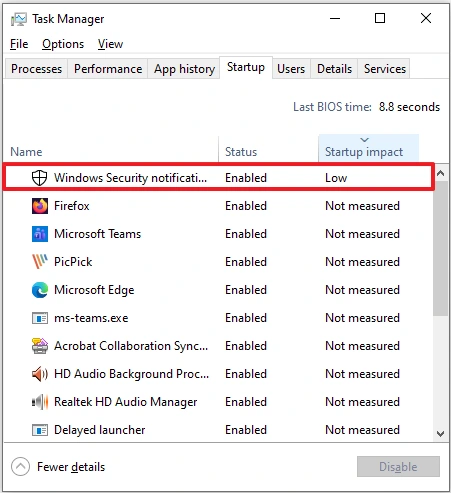
5. Disable high-impact startup apps
Apps that launch automatically at sign-in are one of the most common causes of CPU usage staying elevated right after you turn your PC on.
- Open Task Manager, go to the Startup apps tab (Windows 11) or Startup tab (Windows 10)
- Click the Startup impact column header to sort by it
- Right-click the highest-rated app you don’t need running immediately, and select Disable, not every PC has something flagged as High, so sort and disable the worst one you actually have, even if it’s only Medium or Low
- If most entries show Not measured, that’s normal, Windows needs a few restarts to collect enough data before it can rate impact accurately
6. Turn off unnecessary background apps
Some apps keep running and consuming resources even after you close their window, particularly ones with system-tray icons or push notifications.
- Go to Settings > Apps > Installed apps (Windows 11) or Settings > Privacy > Background apps (Windows 10)
- Review the list and turn off background permissions for anything you don’t need updating in real time
Fix OS-specific and third-party background culprits
7. Rule out the search process itself
If the process at the top of your CPU list is the search process, this is common enough to be its own fix rather than a footnote. For the full breakdown of why this happens and how to fix it properly, see our guide on Windows search not working, which covers this exact high-CPU scenario in detail.
8. Turn off background features you don’t use
On Windows 11, Widgets, Copilot, and background search indexing are common contributors to elevated idle CPU usage:
- Right-click the taskbar, choose Taskbar settings, and turn off Widgets if you don’t use them
- If Copilot is running in the background and you don’t use it, end its task in Task Manager or remove it under Settings > Apps > Installed apps
- Go to Settings > Privacy & security > Searching Windows and confirm indexing isn’t actively re-scanning a large drive
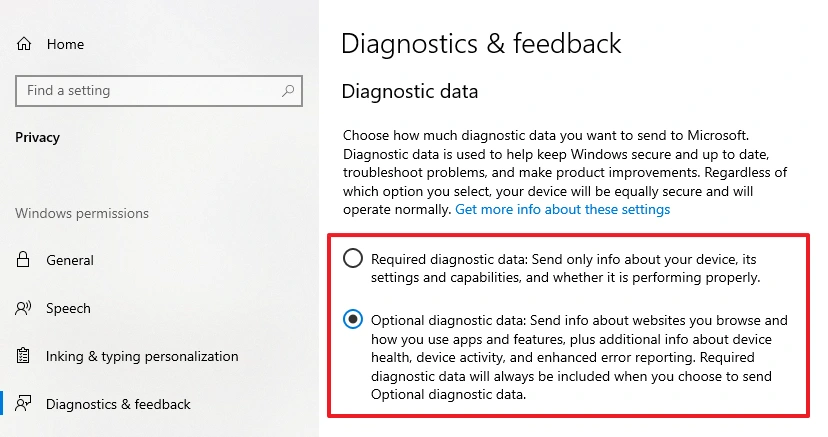
On Windows 10, background diagnostic data collection (the process behind this is usually CompatTelRunner.exe) is the equivalent culprit, it periodically scans your system and can briefly spike CPU while doing so:
- Go to Settings > Privacy > Diagnostics & feedback and select Required diagnostic data if Optional diagnostic data is currently selected
Cortana used to be the more commonly cited cause here, but Microsoft retired it as a standalone Windows app in 2023, so it’s no longer present to disable on current installs.
9. Check third-party hardware and driver-bundled services
If the process using high CPU has a name like NVIDIA Container, WMI Provider Host, or a service tied to your keyboard, mouse, or audio software (Razer Synapse and similar audio or peripheral utilities are common examples), a third-party hardware utility is the cause, not Windows itself. These bundled background services are a genuinely common culprit that generic troubleshooting advice tends to miss entirely.
- Open the manufacturer’s own control app (GeForce Experience, Razer Synapse, or your audio software’s settings) and check whether it has a lighter or “lite” mode, or a setting to disable background telemetry
- If you don’t use the extra features that app provides, consider uninstalling it and relying on Windows’ own built-in drivers instead
- For any Windows service you don’t recognize the purpose of, our Windows Services Manager guide covers how to safely identify and manage what each one does before disabling anything
10. Pause or narrow cloud sync during heavy CPU periods
OneDrive, Google Drive, and Dropbox all use background CPU cycles to sync files, which compounds with everything else running if you’re already CPU-constrained.
- Right-click the sync app’s icon in the system tray
- Select Pause syncing temporarily, or go into its settings and reduce how many folders it actively syncs
Adjust performance and power settings
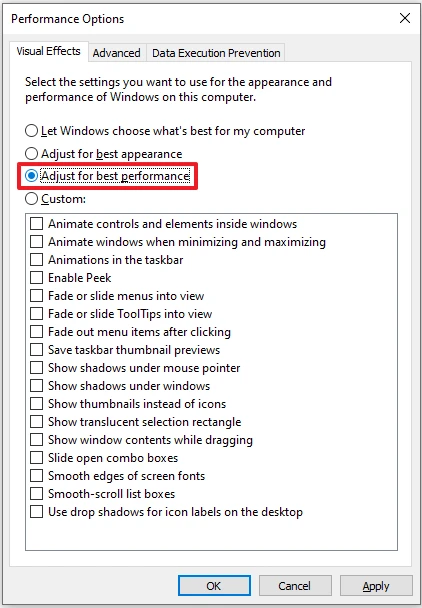
11. Adjust visual effects for best performance
Windows’ visual effects (animations, shadows, transparency) use a small but constant amount of CPU and GPU resources that add up on older or lower-powered machines.
- Search for Adjust the appearance and performance of Windows in the Start menu and open it
- Under the Visual Effects tab, select Adjust for best performance, or manually uncheck the effects you don’t care about
12. Choose the right power plan for your actual problem
Power settings affect CPU usage in two different, sometimes opposite, ways, so it’s worth knowing which problem you actually have before changing anything.
- If your CPU sits at a higher baseline usage even when idle, a performance-focused setting can be the cause, since it keeps clock speeds elevated by default. On Windows 11, go to Settings > System > Power & battery > Power mode and choose Balanced. On Windows 10, open Control Panel > Power Options and select the Balanced plan. This often brings idle usage down without hurting everyday performance.
- If instead a demanding task feels like it’s struggling to keep up, a power-saving setting may be throttling the CPU in the other direction. Switch up to Balanced, or to Best performance (Windows 11) or High performance (Windows 10, under Show additional plans) for that specific task.
13. Cap Turbo Boost or undervolt if you’re thermal throttling
This one is more advanced, and it’s only worth doing if Fix 17 below confirms your CPU is actually running hot. On laptops with weaker cooling in particular, Intel Turbo Boost Technology pushing the CPU above its base clock speed can generate more heat than the cooling can handle, which shows up as high sustained CPU usage, throttling, and stuttering rather than smooth performance.
- Go to Control Panel > Power Options, click Change plan settings next to your active plan, then Change advanced power settings
- Expand Processor power management > Maximum processor state
- Lower both On battery and Plugged in values to around 99%, this disables Turbo Boost specifically rather than affecting your base clock speed
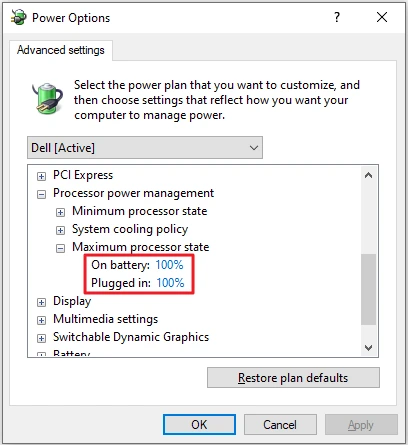
If Processor power management doesn’t appear as an option at all, it’s hidden rather than missing. Back up your registry first, then open Registry Editor, navigate to HKEY_LOCAL_MACHINE\SYSTEM\CurrentControlSet\Control\Power, set CsEnabled to 0, and restart. This only unhides the setting, it doesn’t change anything else, and it’s fully reversible, set the value back to 1 (or delete it) and restart if you ever want the option hidden again.
Capping Turbo Boost is a blunt fix, it trades away your CPU’s peak speed to reduce heat everywhere, all the time.
A more precise alternative, if you’re comfortable with a bit more setup, is undervolting: tools like ThrottleStop for Intel CPUs, or Ryzen Controller and MSI Afterburner for AMD, reduce the voltage the CPU needs to hit the same clock speeds, which lowers heat and power draw without sacrificing peak performance the way capping Turbo Boost does. This also has a real battery-life benefit on laptops.
Only download these from the developer’s own site, and apply a small voltage change first, then run your PC normally for a day before going further, a large offset applied all at once is far more likely to cause crashes than a gradual one.
Fix update and driver related high CPU usage
14. Update your drivers the safe way
Outdated graphics, chipset, or storage drivers are a frequent, easy-to-overlook cause of background CPU load, particularly after a Windows feature update changes how hardware is managed.
- Open Device Manager (right-click the Start button and select it)
- Expand each category, right-click your key devices (graphics, chipset, network), and select Update driver
- Restart once finished
Avoid third-party “driver update” tools you find advertised online, the worst of these bundle malware, and the more legitimate ones are usually redundant since Windows and your hardware manufacturer’s own official tools already handle this. Updating your BIOS is a separate, more drastic step, it rarely improves CPU usage on its own and can introduce new problems, so only do it if you’ve identified a specific, documented bug that a BIOS update directly fixes.
15. Install pending updates, or roll back a bad one
Microsoft periodically ships updates that unintentionally introduce a CPU-usage bug, which then gets patched in a following update. Check both directions.
- Go to Settings > Windows Update, click Check for updates, and install anything pending
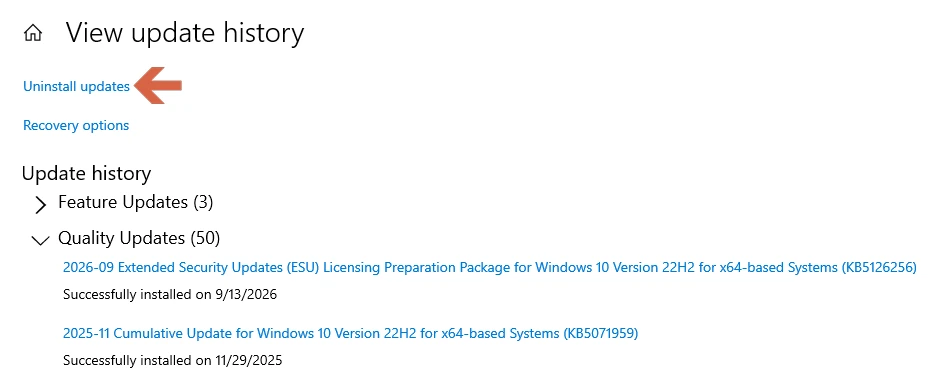
- If the high usage started right after a specific update, go to Update history > Uninstall updates and remove that one instead
Rule out malware and deeper system issues
16. Scan for cryptomining malware and disguised processes
A process using sustained high CPU while disguised under a legitimate-sounding name (a fake svchost.exe or similar) is a known pattern for “cryptojacking” malware specifically, malicious software that hijacks your CPU to mine cryptocurrency for someone else, since it needs sustained CPU cycles to be worth installing in the first place.
Note that Antimalware Service Executable, Windows Defender’s own process, legitimately spikes CPU during an active scan, that’s expected behavior, not a problem to fix.
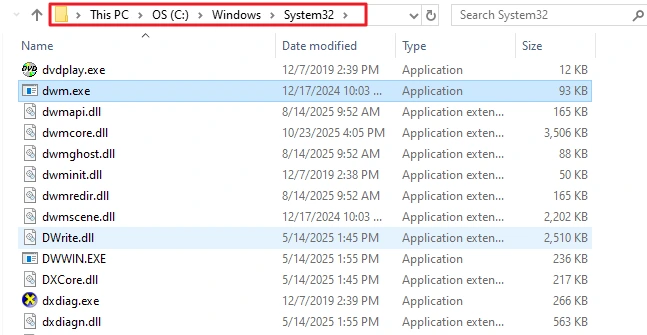
- In Task Manager, right-click the suspicious process and select Open file location
- Confirm it’s running from
C:\Windows\System32or another expected system folder, not a random user or temp folder - Run Windows Security > Virus & Threat Protection > Full scan if anything looks off
17. Check CPU temperature for thermal throttling
High CPU usage paired with unusual heat and fan noise, even for simple tasks, often points to a hardware cause rather than software, particularly on older laptops or after years of use as thermal paste dries out.
- Download a monitoring tool like HWMonitor or Core Temp and check your CPU temperature at idle and under light load
- Sustained temperatures near or above 90°C on a modern CPU, especially at idle, indicate throttling, not a normal workload
- If temperatures are high, see Fix 13 above, or consider having your cooler cleaned or its thermal paste replaced
18. Run a Clean Boot to isolate the cause
If nothing above finds a clear culprit, a Clean Boot starts Windows with only essential services and no third-party startup programs, which tells you whether the cause is a Windows component or something you installed.
- Press Win + R, type
msconfig, and press Enter - On the Services tab, check Hide all Microsoft services, then click Disable all
- On the Startup tab, open Task Manager and disable all remaining startup items
- Restart and check whether CPU usage stays normal
- When you’re done testing, reopen msconfig, select Normal startup on the General tab, and re-enable the startup items you actually want, a Clean Boot is meant to be temporary, not a permanent state
19. Run SFC, DISM, and CHKDSK scans
Corrupted system files can cause background Windows processes to work harder than they should, retrying failed operations repeatedly, and disk errors can produce similar symptoms.
- Open Command Prompt as administrator
- Run
sfc /scannowand let it finish - Then run
DISM /Online /Cleanup-Image /RestoreHealth - Run
chkdsk C: /fto check your system drive for errors, you’ll be prompted to schedule it on next restart - If the Disk column in Task Manager is also stuck near the top, see how to fix 100% disk usage in Windows 10
- Once it starts on restart, let it run to completion without interrupting it, it can take a while on a large or older drive, and back up anything important beforehand since a drive check is a reasonable moment to be cautious, not because it’s expected to cause problems
- Restart once everything completes
If you suspect faulty RAM rather than disk or system files, Windows Memory Diagnostic (search for it in the Start menu) is worth running too, memory errors can also manifest as erratic CPU behavior.
20. Try System Restore before a full reinstall
If a specific change caused this and you’re not sure what, System Restore rolls your system back to an earlier point without removing your personal files, a lighter option than a full reset. It does undo recently installed apps, drivers, and updates from after that point, so anything you installed since will need reinstalling if you go back far enough. It only works if System Protection was already turned on before the problem started, and it’s off by default on some Windows 10 setups, so check that first.
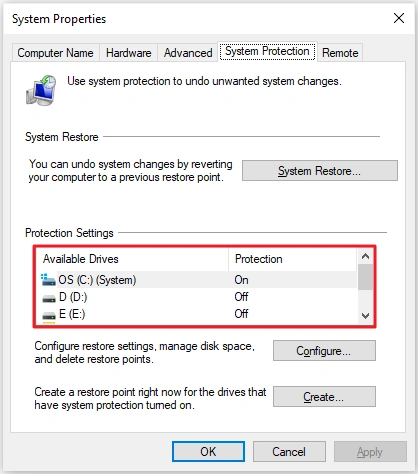
- Open the Start menu, search for Create a restore point, and open the System Protection tab
- Check the Protection Settings list: if your system drive shows Off, there are no restore points to go back to, and turning it on now only helps with future problems
- If it shows On, click System Restore, choose a restore point from before the high CPU usage started, and follow the prompts
- If the Next button is greyed out, Windows has no restore point to go back to, even with protection on, so skip ahead to Fix 21
- Restart once the process completes
21. Reset or reinstall Windows as a true last resort
- Go to Settings > System > Recovery
- Under Reset this PC, choose Reset PC
- Select Keep my files
This reloads Windows system files from scratch without touching your personal files, but you will need to reinstall your applications afterward.
Power-user tools for deeper CPU diagnosis
If you want more visibility than Task Manager gives you by default, these free tools go further:
- CPU-Z shows your exact CPU model, clock speeds, and motherboard details, useful when searching for known issues specific to your hardware
- Process Monitor logs not just CPU usage but registry, file system, and network activity per process, useful for spotting suspicious behavior a basic scan might miss
- Performance Monitor (press Win + R, type
perfmon) tracks a process’s CPU usage over time in far more detail than Task Manager, useful for catching an intermittent spike you can’t reproduce on demand
How to Lower CPU Usage in Windows 11
If you’re specifically on Windows 11, these are the levers unique to it:
- Use Efficiency Mode (Fix 4) on any process you need open but don’t need running at full priority
- Turn off Widgets and Copilot background activity if you don’t use them (Fix 8)
- Check Settings > Privacy & security > Searching Windows for indexing load, especially right after setting up a new PC
- Task Manager’s redesigned layout puts Startup apps as its own left-hand tab rather than under Processes
How to Lower CPU Usage in Windows 10
If you’re on Windows 10, a few things work differently:
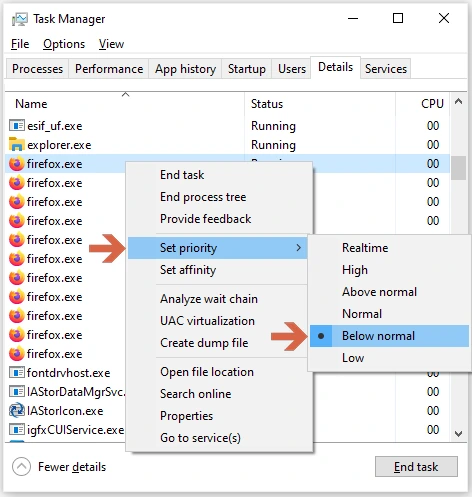
- There’s no Efficiency Mode, the closest manual equivalent is going to Task Manager’s Details tab, right-clicking the process, choosing Set priority, and lowering it to Below normal
- Background diagnostic data collection (Fix 8) is the more common OS-specific culprit than any Windows 11 feature, Cortana previously played this role but Microsoft retired it as a standalone app in 2023
- Startup apps live under Task Manager’s Startup tab, not a separate section
- Classic search indexing settings are under Control Panel > Indexing Options rather than the newer Settings app page
When lowering CPU usage isn’t enough
If you’ve worked through everything above and usage is still consistently high, it’s worth considering whether the issue is workload rather than software. A CPU that’s several generations old, or a laptop that’s thermally throttling under sustained load, will show high usage simply because it’s working harder to do the same task a newer chip would handle at a lower percentage. In that case, more RAM can help by reducing how much the system relies on the CPU to manage memory swapping, but it won’t fix a CPU that’s genuinely underpowered for what you’re asking it to do.
Frequently asked questions
Why is my CPU usage so high for no reason?
It’s rarely actually “no reason”, it’s usually a background process you haven’t identified yet. Sort Task Manager by CPU (Fix 1) before assuming it’s unexplainable.
How to reduce CPU usage quickly?
Open Task Manager, sort by CPU (Fix 1), and end the one process sitting at the top if it isn’t a protected system process (Fix 2). If it’s your browser, close extra tabs and disable heavy extensions (Fix 3). For most people, those three steps are enough to reduce CPU usage without touching a single setting.
What is a normal CPU usage percentage?
Individual background processes should sit at 0-1%, and everything combined should stay under 10% while your PC is idle. Sustained usage above 50% with nothing intensive open is worth investigating.
Is 100% CPU usage dangerous?
No, CPUs are designed to run safely at 100% during demanding tasks like gaming, exporting video, or running a build. Sustained high usage paired with high temperatures over long periods is what’s actually worth addressing, not the percentage on its own.
Is Runtime Broker or Antimalware Service Executable safe?
Yes, both are legitimate Windows processes. Runtime Broker manages permissions for apps from the Microsoft Store, and Antimalware Service Executable is Windows Defender, it’s expected to spike briefly during an active scan.
Does defragmenting my drive lower CPU usage?
Only if you’re still using a traditional hard drive (HDD), and even then it affects disk speed more than CPU usage directly. Never manually defragment a solid-state drive (SSD), Windows already optimizes SSDs automatically, and manual defragmentation can shorten its lifespan.
How do I lower CPU usage in Windows 11?
Start with Efficiency Mode on the offending process (Fix 4), then check Widgets and Copilot background activity (Fix 8). See the dedicated Windows 11 section above for the full list.
How do I lower CPU usage in Windows 10?
Since Windows 10 doesn’t have Efficiency Mode, use Set Priority instead (see the Windows 10 section above), and check your diagnostic data settings first.
Will ending a high-CPU process delete my files or data?
No, ending a task just closes that running process. Any unsaved work in that specific app could be lost, but ending a task doesn’t touch files already saved to disk.
Does more RAM lower CPU usage?
Sometimes indirectly, more RAM reduces how often Windows has to swap memory to disk, which can ease CPU load in memory-constrained situations, but it won’t fix a CPU-bound problem on its own.
Bottom line
How to lower CPU usage almost always comes down to identifying one specific process first, rather than guessing at system-wide fixes. Start with Task Manager sorted by CPU, work through startup apps, browser tabs, background features, and third-party services before touching power settings or Turbo Boost, and save malware scans, thermal checks, and a full system reset for when everything simpler has already been ruled out.
If you only do three things: sort Task Manager by CPU today, disable your worst startup apps this week, and check your CPU temperature if the fan noise doesn’t go away, that alone is enough to reduce CPU usage in most cases without needing to touch a single advanced setting.
This guide is reviewed and re-tested whenever Microsoft changes Task Manager or related settings. Last verified: September 2026, on Windows 10 22H2, with Windows 11 steps checked against Microsoft’s documentation.