A green Appium suite and a broken TalkBack experience can live in the same build. The locators find every button, the tests pass, and the labels behind those locators are test IDs like btn_submit_01 that a screen reader reads aloud, character by character. Appium accessibility testing can catch a good share of that, but only if you know which commands exist and where they stop.
I have spent most of my career in manual and automation testing, and this is the guide I wanted when I first tried to add accessibility checks to a mobile suite: Appium 3, iOS and Android, working code, and an honest list of what still needs a human with a screen reader.
Appium accessibility testing works through three mechanisms. Appium finds elements by their accessibility labels, it runs Apple’s built-in audit on iOS with mobile: performAccessibilityAudit, and it exposes accessibility attributes and element sizes on Android that you can assert on in code. It cannot judge whether a label makes sense to a person using a screen reader, or whether the focus order feels natural. Manual TalkBack and VoiceOver passes cover everything else.
Version note: this guide reflects Appium 3.7.0 or later (3.7.0 was released 24 August 2026), the UiAutomator2 driver 8.4 or later, the XCUITest driver 12.17 documentation, and WCAG 2.2 Level AA, all checked in October 2026. The iOS audit command needs Xcode 15 and iOS 17 or later.
How Appium Accessibility Testing Actually Works
Appium is a black-box driver. On Android it talks to your app through UiAutomator2, and on iOS through XCUITest, and both read the platform accessibility tree. TalkBack and VoiceOver read that same tree. That overlap is why a test that finds a button by its label has already told you something about accessibility, and why it can also mislead you.
The Appium accessibility id locator is where most teams first touch that tree. On Android it matches the content description exactly. On iOS the driver treats it as an alias for the name attribute, which is the accessibility identifier when the developer has set one. One string, two audiences, and that is the trap. Appium Inspector shows both the accessibility id and the resource id for the same button, as the screenshot below does.
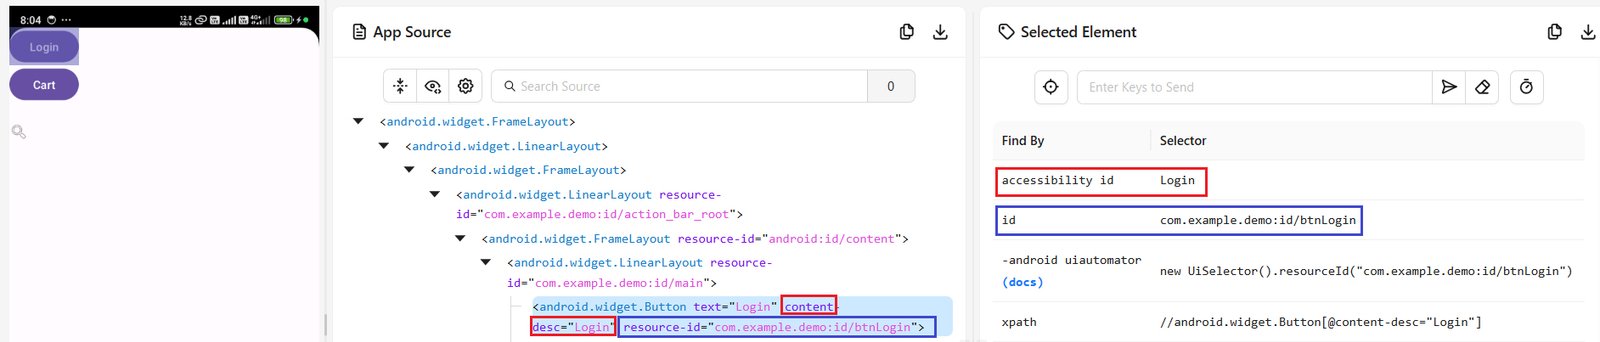
Android makes the trap sharper. TalkBack speaks the content description, so a test hook like btn_submit_01 becomes spoken output. iOS is kinder here, because VoiceOver speaks the accessibility label and ignores the identifier. Either way, a passing accessibility id lookup proves an element has a name. It never proves the name is good.
What Appium adds beyond locators differs per platform. On iOS, the XCUITest driver wraps Apple’s audit API and adds commands to switch contrast and text size on a simulator. On Android, UiAutomator2 returns accessibility attributes such as content-desc, heading, pane-title, a11y-important and screen-reader-focusable, along with element bounds. For paid scans across both platforms, Deque’s axe DevTools Mobile plugs into Appium sessions through a mobile: axeScan command and needs a Deque API key.
This guide covers native and hybrid apps. If you automate a mobile browser instead, the web tooling in my Playwright accessibility testing guide fits better, because axe-core can read the DOM directly. And if accessibility testing itself is new to you, start with the full accessibility testing guide for QA engineers and come back.
Appium accessibility testing works best as a regression layer, not a discovery tool. A person finds the problem once with a screen reader. Appium makes sure it stays fixed in every build.
Setting Up Accessibility Checks in Appium 3, Step by Step
These seven steps take a fresh machine to working Appium accessibility testing on both platforms. The code uses WebdriverIO, and the mobile: commands are the same in the Java, Python and C# clients.
- Check Node and install Appium 3 with both drivers. Appium 3 needs Node.js
^20.19.0,^22.12.0or 24 and above, plus npm 10 or newer. The iOS driver also needs a Mac with Xcode.
   node --version
   npm install -g appium
   appium driver install uiautomator2
   appium driver install xcuitest
   appium --version
- Give elements human labels before you assert on them. On Android, write the content description for people and use resource ids for test hooks. On iOS, set the accessibility label for VoiceOver and keep the accessibility identifier for tests. In a React Native app,
accessibilityLabellands in the Android content description. Note the trade-off: the accessibility id locator on Android now changes with the app language, so useidfor hooks and save accessibility id for elements whose label you are deliberately testing. - Start each session with accessibility in mind. UiAutomator suppresses accessibility services during a session by default, which matters if you plan to run alongside TalkBack. The capability below tells the instrumentation process to leave them alone.
   export const android = {
     platformName: 'Android',
     'appium:automationName': 'UiAutomator2',
     'appium:app': '/path/to/demo.apk',
     // Stops UiAutomator from switching off accessibility services mid-session
     'appium:disableSuppressAccessibilityService': true,
   };

   export const ios = {
     platformName: 'iOS',
     'appium:automationName': 'XCUITest',
     'appium:deviceName': 'iPhone 15', // any installed simulator on iOS 17 or later
     'appium:app': '/path/to/Demo.app',
   };
- Run the iOS audit on every key screen. For iOS accessibility testing, the XCUITest driver does the heavy lifting. The audit types come from Apple’s
XCUIAccessibilityAuditTypelist, and the XCUITest driver execute methods reference documents the arguments. LeaveauditTypesout to run every type. Each returned issue carriesauditType,compactDescription,detailedDescriptionand theelementit belongs to.
   describe('iOS accessibility audit', () => {
     it('home screen has no contrast, detection or description issues', async () => {
       const issues = await driver.executeScript('mobile: performAccessibilityAudit', [{
         auditTypes: [
           'XCUIAccessibilityAuditTypeContrast',
           'XCUIAccessibilityAuditTypeElementDetection',
           'XCUIAccessibilityAuditTypeSufficientElementDescription',
         ],
       }]);

       const report = issues.map(
         (i) => `${i.auditType} | ${i.compactDescription} | ${i.element}`
       );
       // An empty array means Apple's audit found nothing for these types
       expect(report).toEqual([]);
     });
   });
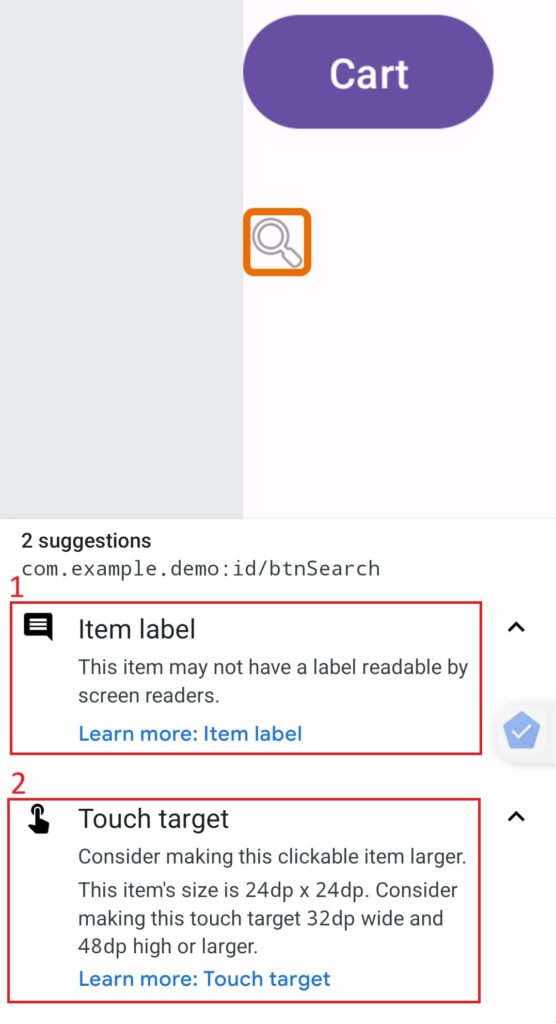
- Add Android name and touch target checks to your flows. Android has no built-in audit command in Appium, so you assert on what the driver exposes. The check below flags clickable elements with no name, and targets under 48dp, which is Google’s touch target guidance and the threshold its Accessibility Test Framework flags. In my demo app, Accessibility Scanner flagged a 24dp icon and suggested 32dp wide and 48dp high or larger, so 48dp in both directions is the conservative bar. WCAG 2.2 success criterion 2.5.8 sets a lower floor of 24 by 24 CSS pixels at Level AA, but CSS pixels do not exist in a native app, so I assert on the stricter platform numbers. Read the density once with
adb shell wm density.
   const MIN_DP = 48;

   async function androidAccessibilityLeads(density) {
     const leads = [];
     const toDp = (px) => px / (density / 160);

     // Clickable elements with no content description and no text
     const unnamed = await $$(
       "//*[@clickable='true'][not(string(@content-desc))][not(string(@text))]"
     );
     for (const el of unnamed) {
       leads.push(`unnamed clickable: ${await el.getAttribute('class')}`);
     }

     // Touch targets under 48dp, found with labels you already trust
     for (const id of ['Login', 'Search', 'Cart']) {
       const el = await $(`~${id}`);
       const { width, height } = await el.getSize();
       if (toDp(width) < MIN_DP || toDp(height) < MIN_DP) {
         leads.push(`small target ${id}: ${toDp(width).toFixed(0)} x ${toDp(height).toFixed(0)} dp`);
       }
     }
     return leads;
   }
Treat the results as leads. A clickable container can get its name from a child, so the first check produces false positives that a human has to clear.
- Script a VoiceOver pass if you can use iOS 27. The XCUITest driver can switch VoiceOver on, move focus and return what it says, but only on iOS 27 or later. Always disable it in teardown, or it stays on.
   await driver.executeScript('mobile: enableVoiceOver', []);
   try {
     const spoken = [];
     for (let i = 0; i < 10; i++) {
       const { utterance } = await driver.executeScript(
         'mobile: voiceOverMove', [{ direction: 'forward' }]
       );
       spoken.push(utterance);
     }
     console.log(spoken); // do these make sense when read in order?
   } finally {
     await driver.executeScript('mobile: disableVoiceOver', []);
   }
- Cross-check by hand, then wire it into CI. On Android, install Accessibility Scanner from Google Play, open Settings, tap Accessibility, then Accessibility Scanner, and turn on Use Accessibility Scanner (older versions label the switch Use service). On iOS, open Xcode, choose Open Developer Tool, then Accessibility Inspector, pick your simulator, switch to the Audit tab and press Run Audit. In CI, fail the build when the issue list for an already-fixed screen is not empty, and store the lists as build artifacts. The screenshot below shows the scanner’s result card for the unlabeled search icon in my demo app.
Which Accessibility Tool to Pair With Appium
Appium is the driver, not the auditor, so the useful question is which checker sits next to it for Appium accessibility testing. Appium a11y work usually ends up using two or three of the options below.
| Tool | Best for | Real limitation | Pricing |
|---|---|---|---|
mobile: performAccessibilityAudit (XCUITest driver) | Scripted iOS checks inside flows you already automate | iOS only, needs Xcode 15 and iOS 17 or later, and a clean result is not proof VoiceOver works well | Free, part of the XCUITest driver |
| axe DevTools Mobile via Appium | One scan command and one dashboard across Android and iOS | Needs a Deque account and API key, and Sauce’s driver docs list iOS 16 and above for iOS | Paid, through Deque |
| Accessibility Scanner (Android) | Fast manual spot checks on a real device | Manual, Android only, and Google says it does not guarantee an app is accessible | Free |
| Accessibility Inspector (Xcode) | Reading labels and running a manual audit on a simulator | Manual and Mac only | Free with Xcode |
| Espresso with Accessibility Test Framework | Android teams that own the source code | Runs inside the app’s test process, not through Appium, and older tutorials for it are marked deprecated | Free, open source |
Take a QA team of four with no tooling budget. The free path covers a lot: the iOS audit command, the Android attribute checks from step 5, and a weekly pass with the scanners. Google’s own Accessibility Scanner help page says the app does not replace manual testing and cannot guarantee accessibility, which is the right way to read every row in that table.
Now take a sprint team retrofitting accessibility into an existing suite full of XPath locators. Moving to the accessibility id strategy helps twice, because the tests get faster and less brittle while the app gains labels. That only works if the labels are written for people first.
If you run on Sauce Labs, they publish Appium images with Deque’s drivers built in, named appium2-deque-accessibility and appium3-deque-accessibility. That saves setup time, but the Deque account requirement still applies.
Where Appium Falls Short for Accessibility
Appium was built to drive apps, not to audit them, and it shows in three places.
- It cannot judge label quality. A label of “Button” passes every locator test and fails every user.
- Android accessibility testing Appium offers out of the box is attributes and sizes, not an audit, so you write the checks yourself or pay for a scanner.
- I found no Appium command that returns TalkBack’s spoken text, while iOS 27 and later has one for VoiceOver.
The mistake I would call out first is the one from the opening. Teams set Android content descriptions to test IDs so Appium can find elements, see a green suite, and mark accessibility as covered. A person using TalkBack then hears btn_submit_01. Separate your test hooks from your labels, and review labels the way you review UI copy.
Here is an opinion that pushes against the usual advice. If you own the Android source, do not build an accessibility scanner on top of Appium. Espresso with Google’s Accessibility Test Framework checks touch target size, missing labels and contrast inside the test process, with direct access to views. Appium sits outside the app and only sees what the accessibility tree exposes. Put the framework in the app repo, keep Appium for end-to-end flows, and check Google’s current Android testing docs before copying setup from older tutorials, since the Espresso accessibility codelab is marked deprecated.
Appium accessibility testing also misses whole classes of problems that need a person: focus order that feels wrong, announcements that arrive too late, and gestures with no alternative.
Appium Accessibility Testing on a Real Redmi Phone
Real devices add their own friction. On my Redmi test phone, the first Appium session failed twice before it opened. The first error was a Permission denial for WRITE_SECURE_SETTINGS while Appium changed the hidden API policy. The second was INSTALL_GRANT_RUNTIME_PERMISSIONS when it tried to install its helper app. A plain Android Studio install had already failed with INSTALL_FAILED_USER_RESTRICTED.
On Xiaomi phones, three Developer options are the ones to check: USB debugging, Install via USB and USB debugging (Security settings). The last two may ask for a SIM card and a Mi account. If the hidden API error still blocks you, the UiAutomator2 driver has an appium:ignoreHiddenApiPolicyError capability for devices where the vendor has locked that policy. Once the session opened, Appium Inspector showed the Login button’s accessibility id and resource id side by side, which is exactly the split from step 2.
Which Option Should You Pick?
There is no single winner for Appium accessibility testing. Pick by situation.
- Your suite already runs on iOS simulators and you use Xcode 15 or later: add
mobile: performAccessibilityAuditfirst. It is free and takes an afternoon. - You ship an Android app and own the code: use the Accessibility Test Framework with Espresso, and use Appium for flow-level checks like step 5.
- You need one dashboard across both platforms and have budget: try axe DevTools Mobile through Appium, and confirm current pricing and device support with Deque before committing.
- You test on a device cloud: check whether the vendor offers Appium images with accessibility drivers built in.
Whatever you choose, keep one rule for every Appium accessibility testing run. Fail the build on a non-empty issue list for screens you have already fixed, and track new screens as warnings until someone owns them.
Getting Started Checklist
Do these three things this week, in this order, to start Appium accessibility testing on a solid footing.
- Run the iOS audit on your five most-used screens and write down the issue count for each. That number is your baseline.
- Search your Android code for content descriptions that look like test IDs, such as names with underscores or numbers, and replace them with labels a person would say out loud.
- Spend 30 minutes with TalkBack or VoiceOver on your sign-up or checkout flow, then write one Appium assertion for each defect you find.
Conclusion
The most useful thing Appium can do for accessibility is hold the line. Find defects with a screen reader and the platform scanners, fix them, then lock each fix in with an assertion that fails the build if it regresses. Start with the iOS audit command and the unnamed-element check on Android, because both take an afternoon. Leave the judgment calls, such as whether a label reads well out loud, to a person with TalkBack or VoiceOver switched on. Appium accessibility testing earns its place in the pipeline by being boring and repeatable.
Frequently Asked Questions
Can Appium run accessibility checks on both Android and iOS?
Yes, Appium accessibility testing works on both, with different tools on each side. On iOS the XCUITest driver wraps Apple’s audit with mobile: performAccessibilityAudit. On Android you assert on attributes and element sizes that UiAutomator2 exposes, or you add a paid scan such as axe DevTools Mobile.
What is the Appium accessibility id, and does it test accessibility?
It is a locator strategy. On Android it matches the content description, and on iOS it acts as an alias for the name attribute, usually the accessibility identifier. Finding an element this way proves the element has a name, not that the name is useful to a screen reader user.
Does Appium work while TalkBack is running?
Yes, with one setting. UiAutomator suppresses accessibility services by default, so set appium:disableSuppressAccessibilityService to true in your Android capabilities. Even then, I found no Appium command that returns what TalkBack says, so verify TalkBack output by hand.
Do I need axe DevTools Mobile for mobile app accessibility testing?
No. The iOS audit command, Android attribute checks, Accessibility Scanner and Accessibility Inspector cost nothing and cover a real share of automated checks. axe DevTools Mobile adds one scan command across both platforms and a results dashboard, and it requires a Deque account and API key.
Does a clean audit mean my app meets WCAG 2.2?
Not by itself. WCAG was written for the web and is applied to native apps by interpretation, and automated audits cover only part of the success criteria. Treat a clean result as “no known automated findings”, then confirm with manual screen reader testing.