Last updated on June 20th, 2025 at 03:04 am
Introduction Of testng.xml File
In TestNG framework, We need to create testng.xml file to create and handle multiple test classes. testng.xml is the file where we can configure our webdriver software automation test, set software test dependency, include or exclude any software test method or class or package, set priority etc.. We will learn each and every thing about TestNG usage in my future posts. Right now let me describe you how to create testng.xml
Creating testng.xml File
- First of all Create a project and webdriver test case as described in my PREVIOUS POST.
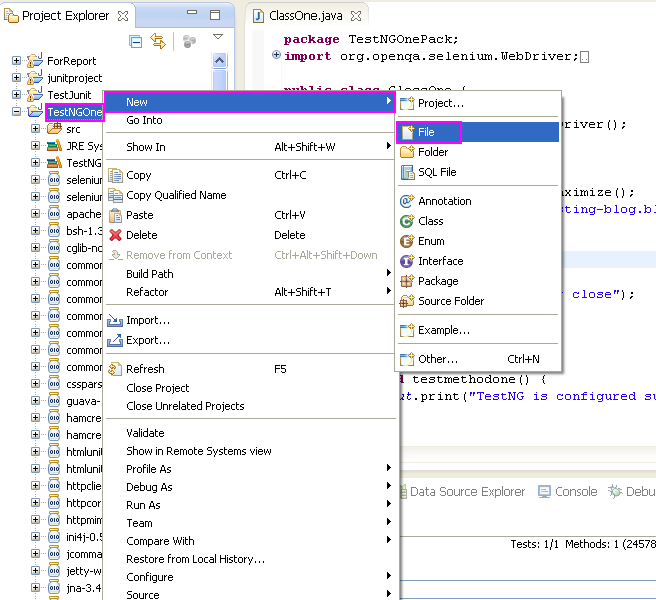
- To create testng.xml file, Right click on project folder and Go to New -> File as shown in bellow given image. It will open New File wizard.
- In New file wizard, select “TestNGOne” project and add file name = “testng.xml” as shown in bellow given image and click on Finish button.
- It will add testng.xml file under your project folder. Now add bellow given lines in your testng.xml file.
<suite name="Suite One" >
 <test name="Test One" >
  <classes>
   <class name="TestNGOnePack.ClassOne" />
  </classes>
 </test>
</suite>
Now your testng.xml file will looks like bellow.
In above testng.xml code,
- <suite> : suite tag defines the TestNG suite. You can give any name to your suite using ‘name’ attribute. In above given example, We have given “Suite One” to our test suite.
- <test> : test tag defines the TestNG test. You can give any name to your test using ‘name’ attribute. In above given example, We have given “Test One” to our test.
- <classes> : classes tag defines multiple class. We can multiple test class under classes tag. In our example we have only one class.
- <class> : class tag defines the class name which you wants to consider in test execution. In above given example, we have defined name=”TestNGOnePack.ClassOne” where ‘TestNGOnePack’ describes package name and ‘ClassOne’ describes class name.
This way, above given testng.xml file will execute only ClassOne class from TestNGOnePack package.
Executing testng.xml File
To Run
Right click on testng.xml file -> Run As -> Select TestNG Suite as shown in bellow given image.
It will start execution of defined software test class ‘ClassOne’ from ‘TestNGOnePack’ package.
When execution completed, You can view test execution HTML report as described in my PREVIOUS POST. Test execution HTML report will looks like bellow.
This is the one simple example of creating and running testng.xml file in eclipse for webdriver software testing tool. We will see different examples of testng.xml file to configure our test in my future post.
[noptin form=5653]


9 thoughts on “Creating And Running WebDriver Test Suit Using testng.xml File”
Hi,
I followed all the methods as u instructed but "TestNG Suite" is not displayed when i did "Right click on testng.xml file -> Run As".
Am getting : Right click on testng.xml file -> Run As->Run configurations.
Please suggest.
Same for me, but I just ran from that window and everything ran as expected, and for subsequent runs, the ''TestNG Suite' is available.
Cheers – very helpful
Hi,
I got the "org.testng.TestNGException:".Please suggest how to rectify this exception
This comment has been removed by the author.
HI,
The code in the textngxml file should be in the below format to get "TestNG Suite " for execution
If created Test.xml doesn't show Run As TestNG option then follow these steps >>
1. Right click on package > select TestNG > Convert to TestNG
2. This would open new window and auto prompt to generate testing.xml
3. Save Test.xml and Right click
4. Run As will show TestNG option
Below is the generated testing.xml format >>
hi,
TestNG.xml suite is not running and not showing any error. how to handle it.
in testng xml change parallel="none" to parallel="false"