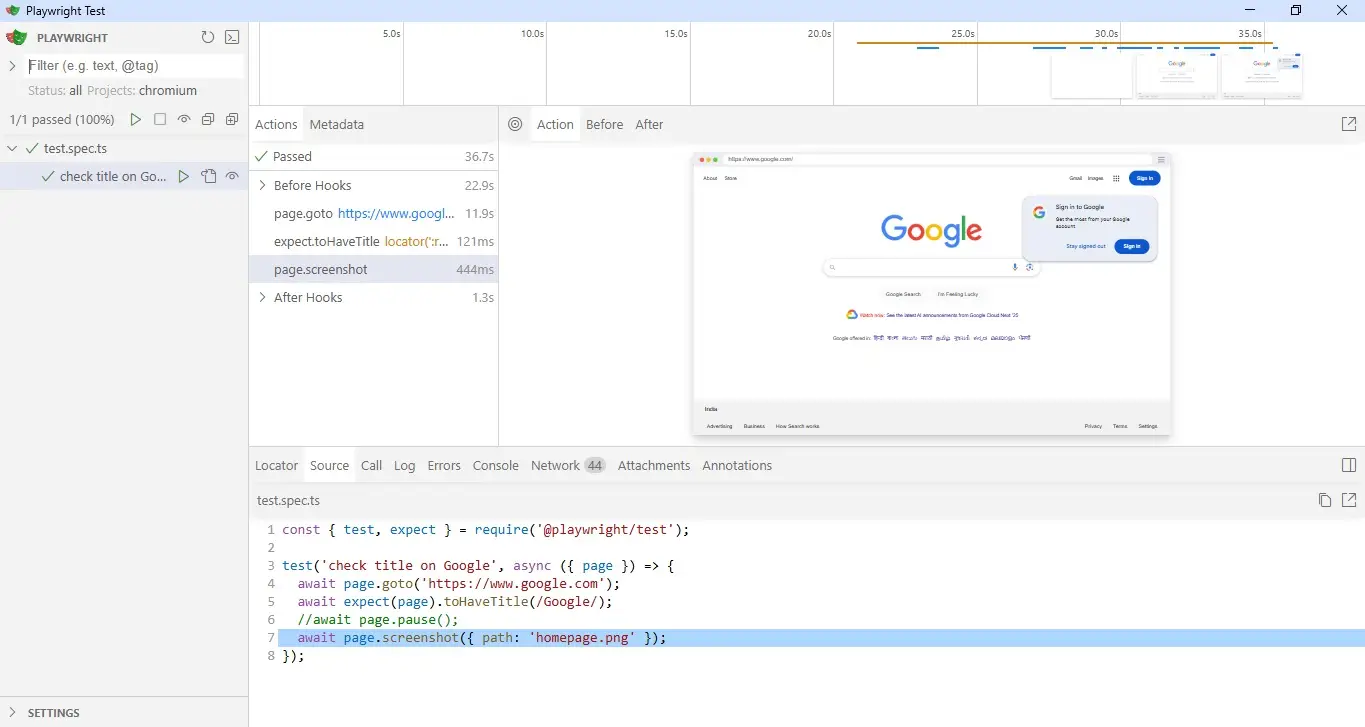
Last updated on September 29th, 2026 at 02:38 pm
I have spent most of the last two decades chasing down flaky test failures while building playwright automation suites. For a long time, I assumed that writing a playwright tutorial like this wasn’t even necessary because people thought flaky tests were just the cost of doing business. A button renders a few milliseconds late, a locator breaks because a developer renamed a CSS class, or a test passes on my laptop but fails on CI for no reason. I added arbitrary sleep timers, rewrote selectors, and told myself this was normal.
It isn’t normal. It is a sign that the underlying test tool was never built for how modern web browsers work today.
That is exactly the problem Microsoft built this framework to solve. It is the core reason I shifted my own enterprise test suites over and have never looked back. In this comprehensive guide, I will walk you through the architecture that makes it blazingly fast, a production-grade framework setup, resilient locators, Page Objects with custom fixtures, and the real-world errors you will inevitably encounter in CI. Every code block here is production-tested and debugged by hand.
- What Is Playwright?
- How Playwright Automation Works Behind the Scenes
- Installing Playwright and Setting Up Your Project
- Writing Your First Playwright Test
- Generating Tests Automatically with Codegen
- Choosing Locators That Do Not Break Every Sprint
- Organizing Locators with the Page Object Model
- Handling Real-World UI: Shadow DOM, Multiple Tabs, and Network Mocking
- Hard vs. Soft Assertions
- Debugging a Failing Test Locally
- Debugging Failures That Only Happen in CI
- Common Playwright Errors and How to Fix Them
- Authentication and Session Management
- Building a Production-Ready Config
- Running Tests in Parallel Across CI with Sharding
- A Quick Checklist Before You Ship a Playwright Suite
- Frequently Asked Questions
- Closing Thoughts
What Is Playwright?
Playwright is an open-source browser testing and automation framework created and maintained by Microsoft. It allows you to write a single test script and execute it seamlessly against Chromium, Firefox, and WebKit browser engines. First released in January 2020, it was engineered from the ground up to handle how modern web applications behave, including asynchronous rendering, single-page apps (SPAs), background API calls, and UI that changes dynamically based on network timing.
You can use the framework for several core QA workflows:
- End-to-end testing – Simulating a real user clicking through your entire application flow.
- UI and functional testing – Verifying that individual frontend components and features behave correctly.
- API testing – Sending HTTP requests and validating backend responses directly within the same test runner.
- Visual regression testing – Catching unintended layout shifts, pixel mismatches, or styling changes.
- Web scraping and browser automation – Driving a headless browser for data collection or any scripted web task outside of testing.
It supports JavaScript, TypeScript, Python, Java, and .NET with identical capabilities across all language bindings. This flexibility is a primary reason why this playwright tutorial focuses on scaling frameworks; teams are never locked into a specific language stack.
If this is your very first time touching the framework and you want to move slower before diving into architecture, our Playwright beginner-level guide is a gentler starting point. Conversely, if you just need a specific topic like advanced locators or Python code snippets, our full tutorials list is organized by topic for quick access.
And if you already know Playwright and just want a specific topic, locators, a particular action, Java or Python instead of TypeScript, our full Playwright tutorials list is organized by topic so you can jump straight to it.
If you have used Selenium or Cypress before, the architecture is what separates this tool from both. Selenium communicates with the browser through an external driver process using HTTP requests, adding an extra translation layer to every single action. Cypress runs directly inside the browser execution context, which is fast but limits your scripts to a single tab and a single origin at a time. Playwright talks directly to the browser engine, giving it incredible execution speed and native multi-tab flexibility.
How Playwright Automation Works Behind the Scenes
Most of the flakiness found in legacy test execution traces back to the old web driver model. Your test code does not talk to the browser directly; it sends an HTTP request to a driver process, which translates that into a browser command, waits for a response, and sends it back. Every click, scroll, and keystroke makes that sluggish round trip.
Playwright skips the intermediate driver layer entirely. Instead, it opens a direct, bi-directional WebSocket connection to the browser engine using the Chrome DevTools Protocol (CDP) for Chromium, the WebDriver BiDi protocol for Firefox, and a custom protocol for WebKit.
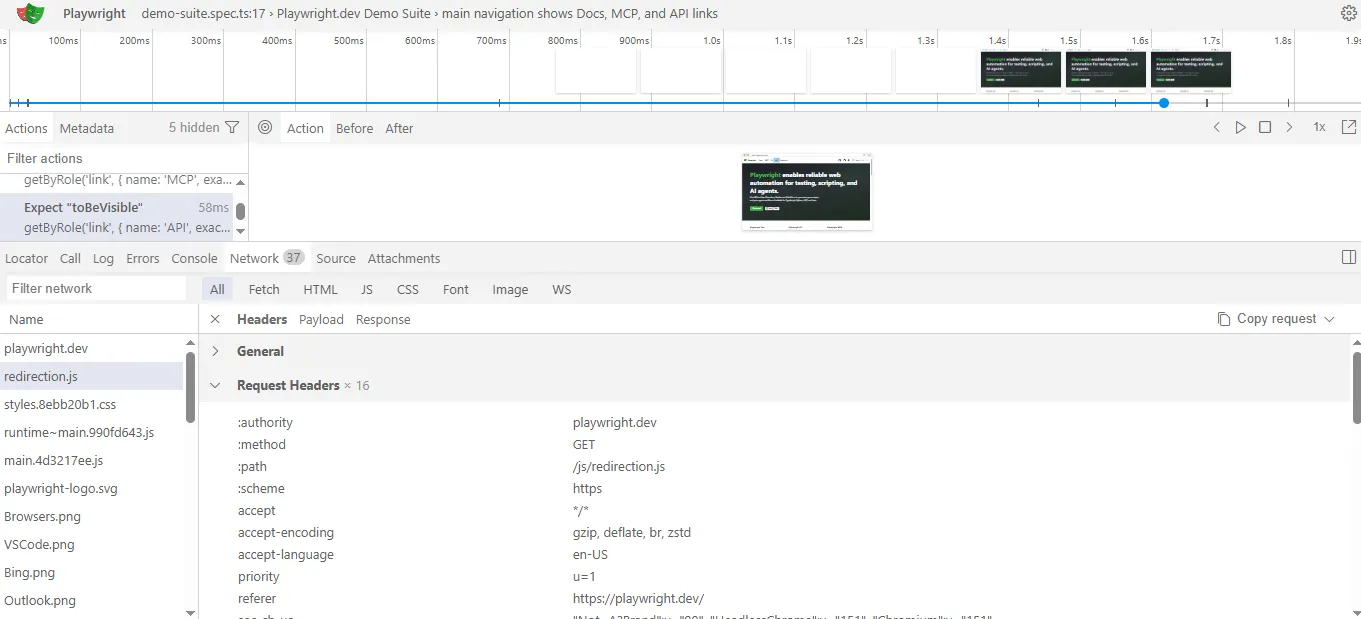
This direct, low-latency connection makes three game-changing features possible:
- Isolated Browser Contexts: A context is a lightweight, isolated environment inside a single browser process, similar to opening an incognito window. You can spin up dozens of them in milliseconds without launching completely separate browser windows, which is why your suites will parallelize exceptionally well.
- Intelligent Auto-Waiting: Before clicking or typing, the engine checks that the element is attached to the DOM, visible, stable, and not intercepted by another element. This built-in actionability check eliminates the need for manual sleep timers.
- Network Interception: Because it sits directly on top of the browser engine, you can read, modify, or fully mock any network request the page makes without relying on an external proxy or extension.
Playwright vs. Selenium vs. Cypress
| Feature | Playwright | Cypress | Selenium |
|---|---|---|---|
| Connection to browser | Direct (WebSockets) | Runs inside the browser | HTTP via a separate driver |
| Cross-browser support | Chromium, Firefox, WebKit | Chromium-based + limited Firefox | Chromium, Firefox, WebKit, and more |
| Parallel execution | Native, out of the box | Requires a paid plan or plugin | Needs Selenium Grid |
| Auto-waiting | Built in | Built in (retry-ability) | Manual waits in most setups |
| Multiple tabs/windows | Native support | Not supported well | Native support |
| Network mocking | Native (page.route()) | Partial support | Requires an external proxy |
None of this means Selenium or Cypress are bad tools. Selenium remains an option if you must support legacy browsers, and Cypress offers a great developer workflow for single-origin apps. However, for robust, cross-browser, end-to-end automation at scale, the architecture wins out. For the fuller breakdown, see our dedicated Playwright vs Selenium comparison.
One honest limitation to keep in mind: Playwright automates desktop web browsers and emulates mobile viewports, but it does not automate native mobile apps (iOS/Android) on real hardware. If your team requires native mobile app automation, you will need to look at a tool like Appium instead.
Installing Playwright and Setting Up Your Project
Before you install anything, you need Node.js 22 or higher on your machine. Playwright currently supports the 22.x, 24.x, and 26.x lines. Check your current version with this command:
node -vIf that returns nothing or a version below 22, install Node.js first. Everything else in this playwright tutorial assumes it is already there.
This guide uses VS Code throughout for the integrated terminal, the file explorer screenshots, and the IntelliSense examples later on. Playwright itself does not require any specific editor, but if you want your screen to match what is shown here, download VS Code for free before continuing.
With that in place, create a project folder, navigate into it, and run:
npm init playwright@latest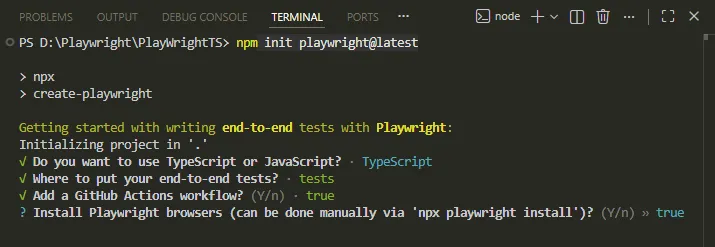
This single command does more than install a package. It walks you through a few choices and then scaffolds a working project around them:
- TypeScript or JavaScript: I use TypeScript on every real project at this point, mainly for the autocomplete and the type-checking on locators and fixtures. If you are just getting started, plain JavaScript works fine too. For a slower, more detailed walkthrough of this exact step, see our dedicated install guides for TypeScript or JavaScript, whichever you’re using.
- Test folder name: Defaults to
tests. There is no reason to change this unless you are merging into an existing repository structure. - GitHub Actions workflow: Say yes if you already know you will run this in CI. You can add it later either way.
- Install browsers: Say yes. This downloads Chromium, Firefox, and WebKit so you are not stuck installing them mid-tutorial.
Once the process finishes, run the sample tests to confirm the install worked:
npx playwright testThis runs the sample tests Playwright generated for you across all three browsers.
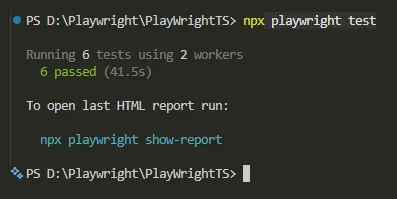
To see the results in a browser instead of the terminal:
npx playwright show-report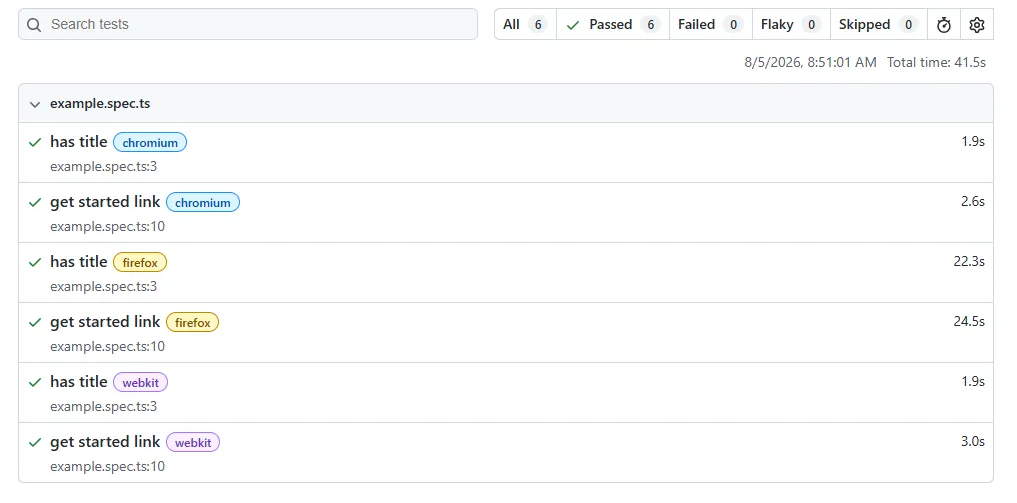
If both of those commands worked, your environment is set up correctly and everything from here on will run the same way.
Understanding the Generated Playwright Project Structure
Take a look at your project folder now. A default Playwright install gives you these files and directories:
playwright.config.ts– The control center for the whole suite. Which browsers run, timeouts, retries, base URL, and reporting are handled here. Almost everything you configure lives here instead of inside individual test files.tests/– Where your test files live. Playwright automatically discovers anything matching*.spec.tsor*.test.tsinside it.tests-examples/– A sample test file Playwright generates so you have something working to look at. This is safe to delete once you understand the pattern.package.json– Your usual Node project file, now with Playwright as a dependency.
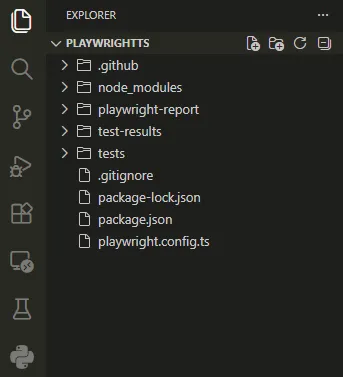
You will also see playwright-report/ and test-results/ show up once you have actually run a test. These are not part of the initial install. Playwright generates them fresh on every run and they are safe to add to your .gitignore file.
For a closer look at how a real project builds on this default layout, see our breakdown of Playwright project structure in TypeScript.
The default configuration file is enough to run basic scripts, but it is not set up for a real pipeline yet. I will rebuild it into a production-ready version later in this guide, once you have seen how the individual pieces work.
Writing Your First Playwright Test
Before getting into locator strategy or framework architecture, it helps to see the smallest possible test end to end. Everything you build later is just a more organized version of this snippet.
Create a new file inside your tests folder:
tests/first.spec.tsEvery script starts with the same two imports:
import { test, expect } from '@playwright/test';testdefines a test case.expecthandles the assertions inside it.
Here is a complete, working test case:
test('homepage has the right title', async ({ page }) => {
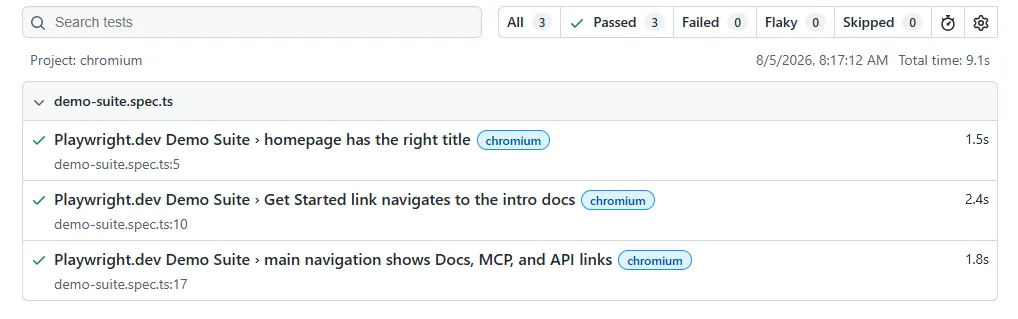
  await page.goto('https://playwright.dev');
  await expect(page).toHaveTitle(/Playwright/);
});
Let’s break down this execution line by line:
{ page }is a fixture Playwright hands you automatically. It represents a single browser tab, already open and ready to use. You never create it yourself.page.goto()navigates to a URL and waits for the page to load before moving on.expect(page).toHaveTitle(...)checks the page title. If it does not match yet because the page is still loading, Playwright retries automatically until it does or until it times out.
Every one of these commands is asynchronous, and every call to them must be preceded by await. Since nearly every line of code from here on depends on it, tracking your asynchronous promises carefully is vital. If that pattern is new to you, our explainer on what await does in Playwright is worth a quick read before going further.
Now add an interaction, so the test does more than just load a static page:
test('search docs and land on a results page', async ({ page }) => {
  await page.goto('https://playwright.dev');
  await page.getByRole('link', { name: 'Get started' }).click();
  await expect(page).toHaveURL(/.*intro/);
});
The getByRole() locator finds the link the same way a screen reader would, by its accessible role and visible text, instead of relying on a CSS class that could change tomorrow.
Run this specific test file with the following command:
npx playwright test tests/first.spec.ts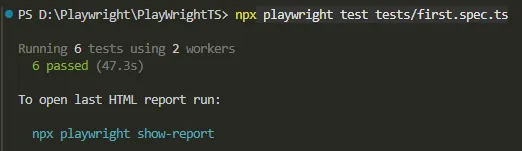
By default, the runner executes headlessly, meaning no browser window opens. To watch it happen visually on your screen, add the headed flag:
npx playwright test tests/first.spec.ts --headed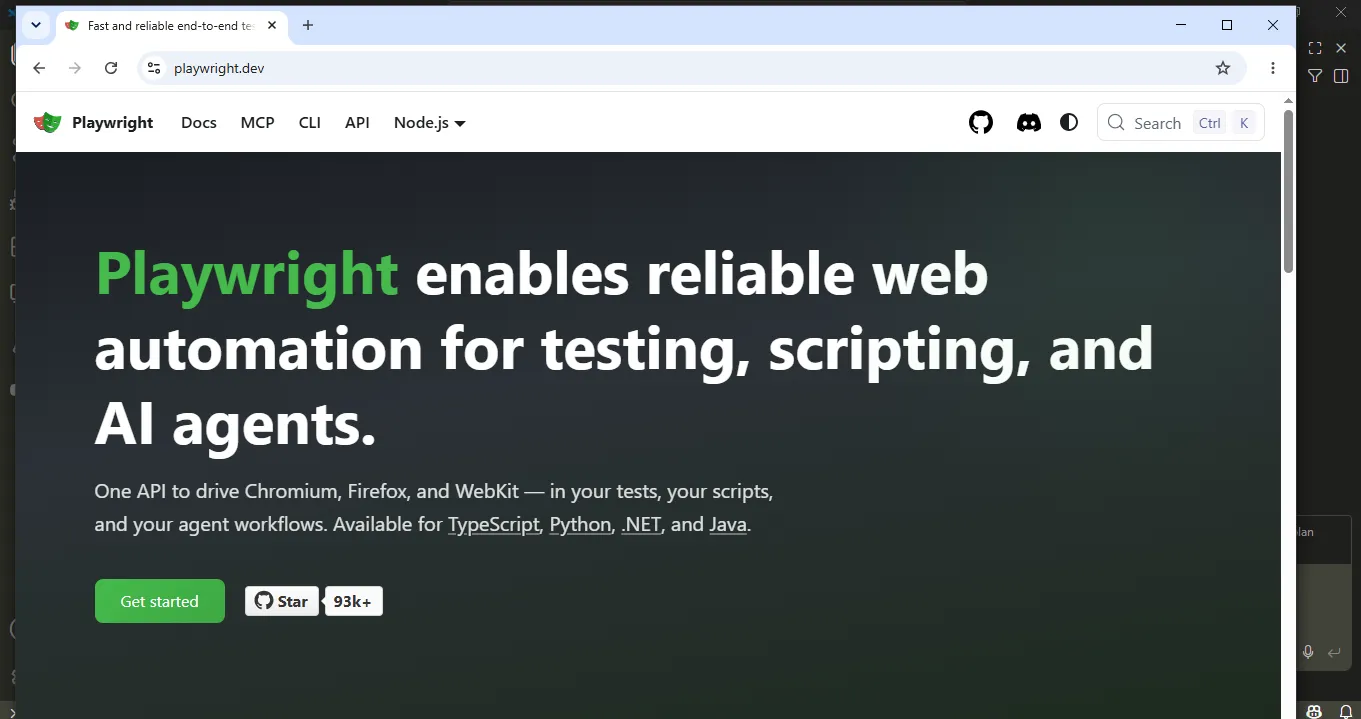
Using headed mode is incredibly helpful while writing a new test to see exactly what the browser is doing. You can switch back to headless mode once you trust the execution flow. Continuous integration pipelines always run headlessly since there is no display to render a window on anyway.
That is the entire mental model: page gives you a tab, you act on it, and you assert against it. Everything else in playwright automation is about making that pattern reliable and reusable at scale.
Generating Tests Automatically with Codegen
Writing every test by hand is not the only way to build out your suite. Playwright ships with an interactive recorder called Codegen that watches you click through your application and writes the test code for you as you go.
Run this command to open the recorder:
npx playwright codegen https://playwright.devThis opens two windows: a real browser pointed at the URL you provided, and the Playwright Inspector alongside it. Click, type, and navigate through the flow you want to verify. The Inspector writes clean Playwright code line by line, utilizing role- and text-based locators automatically. When you are done, you can copy the generated code straight into your spec file.
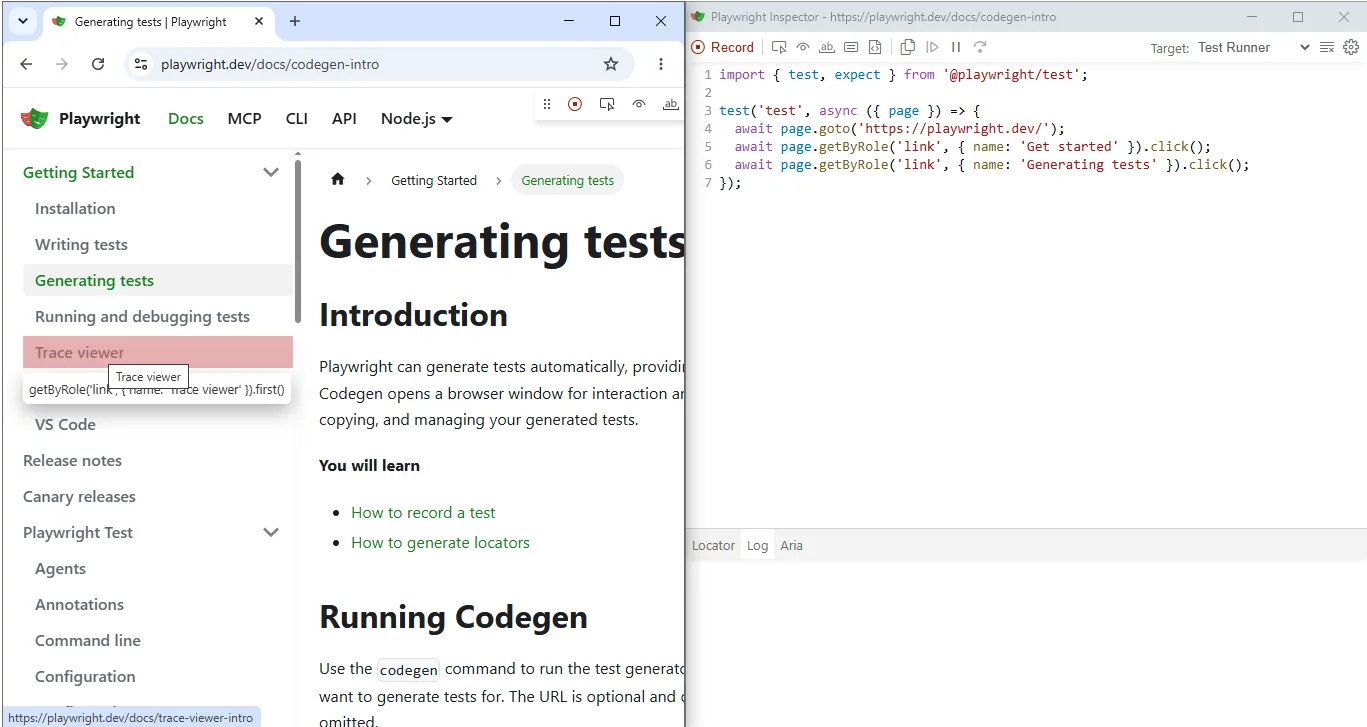
I use it constantly for two specific cases: prototyping a flow I don’t want to hand-write from scratch, and figuring out the locator for something awkward, since Codegen will tell you exactly what it would target if you clicked that element right now.
What I don’t do is ship the generated code as-is. Codegen records the literal sequence of actions you performed, including ones that don’t belong in a maintainable test, like re-clicking something you missed or navigating somewhere by accident. Treat the output as a first draft: pull the locators and structure into a Page Object, drop anything that isn’t part of the actual flow, and add the assertions the recording doesn’t know to make on its own.
That editing step is really the same judgment call as everything in the next section: which locators are worth keeping. For the full recorder walkthrough, including flags for saving auth state and targeting specific languages, see our dedicated Playwright Recorder / Codegen guide.
Choosing Locators That Do Not Break Every Sprint
The absolute fastest way to build a flaky test suite
is to rely on implementation details like deeply nested CSS paths or absolute XPaths. When you copy an XPath like //div[@class="login-container"]/form/div/input from DevTools, you tie your test’s survival to the exact internal markup layout. The moment a frontend developer adds a wrapper <div> for styling, or shifts a layout from a form to an asynchronous component, your locator breaks—even if the UI looks completely identical to the end user.
Playwright forces a shift in mindset: test your application the same way a real human or a screen reader interacts with it. By targeting elements via accessible roles, associated labels, or visible text, your test code naturally mirrors user behavior. This makes your locator strategy highly resilient to visual and structural redesigns.
The Resilient Locator Hierarchy
When inspecting an element, step through Playwright’s native locator engines using this strict priority order:
| Priority | Locator Engine | Best Used For | Resiliency Level |
| 1 | getByRole() | Buttons, links, checkboxes, headings, alerts. | Highest (Tied to accessibility tree specs) |
| 2 | getByLabel() | Form inputs with explicitly linked <label> tags. | High (Tied directly to visual form fields) |
| 3 | getByPlaceholder() | Search boxes or form fields missing explicit labels. | Medium (Breaks if placeholder text is updated) |
| 4 | getByText() | Static copy, notification banners, confirmation alerts. | Medium-Low (Sensible to typos, copy tweaks, or i18n) |
| 5 | getByTestId() | Complex tables, layout nodes, dynamic chart wrappers. | Explicit Escape Hatch (Safe, but hides UX bugs) |
Deep Dive: Putting the Hierarchy Into Practice
1. getByRole(): The Gold Standard
getByRole() hooks into the browser’s Accessibility Tree. This tree is dictated by semantic HTML or ARIA attributes, meaning it outlives typical class name or layout changes.
When using roles, always pass the name option to narrow down the match. Use Regular Expressions with the case-insensitive flag (/example/i) instead of exact strings. This prevents your tests from crashing over minor capitalization differences.
// Resilient: Targets semantic role and matches text safely via regex
await page.getByRole('textbox', { name: /email address/i }).fill('qa_engineer@example.com');
await page.getByRole('button', { name: /submit/i }).click();
Common accessible roles include: 'button', 'checkbox', 'heading', 'link', 'textbox', 'alert', and 'dialog'.
2. getByLabel() and getByPlaceholder(): Form Specialists
If an input isn’t easily accessible via a direct role name, look at how it presents itself to the user. Forms should ideally bind their text labels to inputs using the for attribute.
// Targets an input tied structurally to <label for="user-pass">Password</label>
await page.getByLabel(/password/i).fill('SuperSecret123!');

// Fallback if no label exists but helper placeholder text is present
await page.getByPlaceholder(/e.g. john@://doe.com).fill('john@doe.com');
3. getByText(): Copy-Driven Verification
Use getByText() when verifying content that has loaded onto the page, such as a confirmation message or informational text. Avoid using it for structural click targets if a role exists.
// Perfect for static content checks
await expect(page.getByText(/your profile has been updated successfully/i)).toBeVisible();Warning: If your application supports multi-language internationalization (i18n), getByText() will break when switching locales unless your regex accounts for translations.
4. getByTestId(): he Strategic Escape Hatch
Reaching for getByTestId() is not a failure; it is a controlled engineering choice. Use it on components owned by third-party design systems where accessible names are unstable, or inside deeply dense data grids where rows lack distinct textual identifiers.
By default, Playwright looks for the data-testid attribute. You append this directly to your source markup:
<div data-testid="dashboard-analytics-card">...</div>Then, pinpoint it instantly in your script:
await expect(page.getByTestId('dashboard-analytics-card')).toBeVisible();Note: If your team prefers a different naming convention like data-qa or data-cy, you can override this globally in your playwright.config.ts file using config.use.testIdAttribute.
Practical Application: Leveraging the Playwright Inspector
You do not have to guess which locator is best. Playwright provides a live, interactive Locator Picker via the Playwright Inspector.
- Run your tests in UI mode or with the debugging flag:
npx playwright test --debug - Click the Record or Pick Locator button inside the inspector interface.
- Hover over any target element on your live web page.
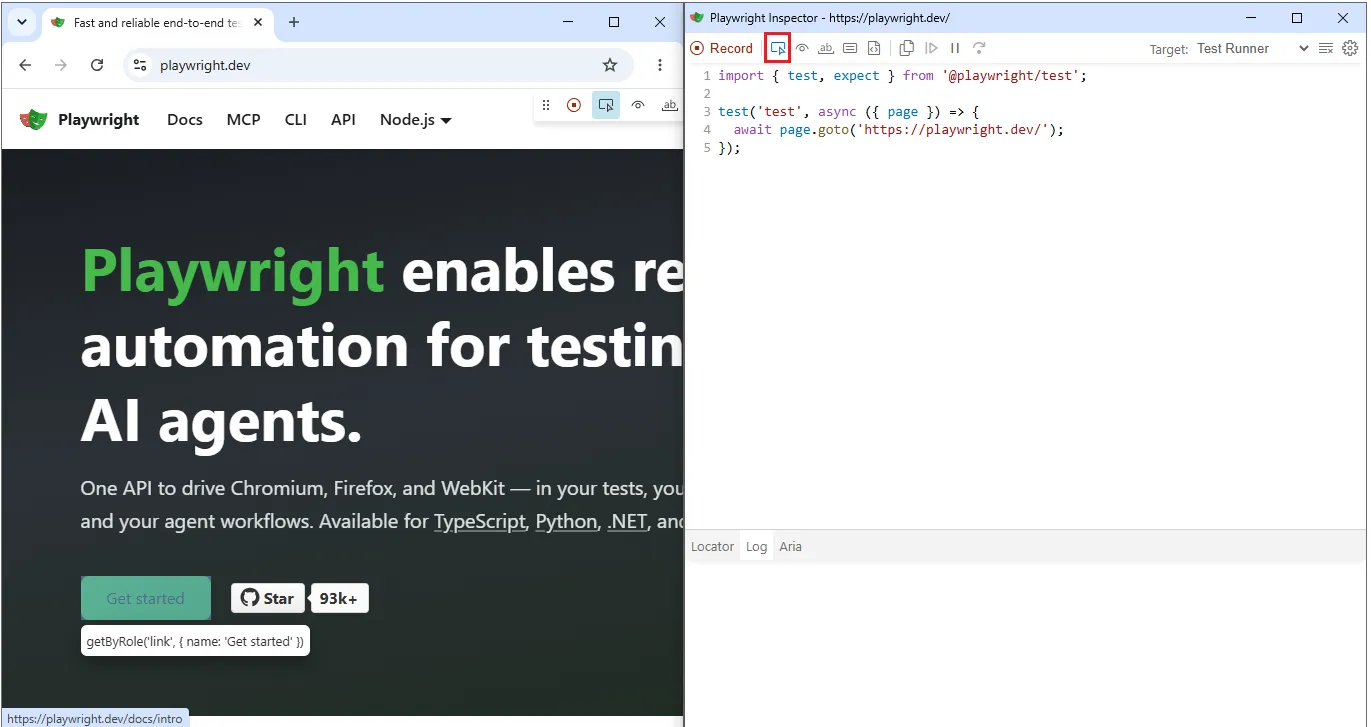
The tool analyzes the target’s underlying accessibility properties and automatically outputs the most resilient, high-priority getByRole or getByLabel engine syntax for you to instantly copy directly into your test suites.
Assertions That Wait, Not Just Check
One more habit worth building alongside locators: use Playwright’s built-in assertions instead of checking a boolean yourself.
// Checks once, at that exact instant. Fails if the UI hasn't caught up yet.
expect(await page.isVisible('.alert')).toBe(true);

// Retries automatically until it's true, or the timeout is reached
await expect(page.getByRole('alert')).toBeVisible();
The first version fails constantly on anything that renders asynchronously, not because the feature is broken, but because the check ran before the UI finished catching up. The second version is what actually removes the need for manual waits, and it is the same reason page.waitForTimeout() should not appear anywhere in a Playwright suite. A fixed wait either wastes time waiting for something that already happened, or fails anyway because it did not wait long enough.
Get the locators and the assertions right, and most of what people call “flaky Playwright tests” simply stops happening. The next problem shows up once your suite grows past a handful of files: keeping all these locators from getting duplicated across every test.
Organizing Locators with the Page Object Model
Once you have more than a few test files, the same locator ends up copy-pasted into every one of them. Change one label on the login form and now you are hunting through a dozen files to fix a dozen broken tests, for a change that had nothing to do with test logic.
The Page Object Model solves this by moving locators and the actions built on them into a dedicated class, one per page or component, so every test imports from a single source instead of redefining it.
Both pages/ and fixtures/ (used in the next part of this section) live at your project root, as siblings of tests/, not nested inside it:
your-project/
├── pages/
│   └── LoginPage.ts
├── fixtures/
│   └── baseTest.ts
├── tests/
│   └── auth.spec.ts
├── playwright.config.ts
└── package.json
That’s what makes the ../pages/LoginPage and ../fixtures/baseTest import paths in the code below resolve correctly, they’re written from inside tests/, going up one level to the project root, then into the sibling folder.
Create a pages folder and build your first page object:
// pages/LoginPage.ts
import { Locator, Page } from '@playwright/test';

export class LoginPage {
  private readonly page: Page;
  private readonly usernameField: Locator;
  private readonly passwordField: Locator;
  private readonly submitButton: Locator;

  constructor(page: Page) {
    this.page = page;
    this.usernameField = page.getByRole('textbox', { name: /username/i });
    this.passwordField = page.getByRole('textbox', { name: /password/i });
    this.submitButton = page.getByRole('button', { name: /log in/i });
  }

  async navigateTo(): Promise<void> {
    await this.page.goto('/login');
  }

  async login(username: string, password: string): Promise<void> {
    await this.usernameField.fill(username);
    await this.passwordField.fill(password);
    await this.submitButton.click();
  }
}
A test can now use this instead of repeating locators:
import { test, expect } from '@playwright/test';
import { LoginPage } from '../pages/LoginPage';

test('user can log in', async ({ page }) => {
  const loginPage = new LoginPage(page);
  await loginPage.navigateTo();
  await loginPage.login('qa_engineer', 'password123');
  await expect(page.getByRole('heading', { name: /dashboard/i })).toBeVisible();
});
That already helps, but notice every test still has to remember to write new LoginPage(page) itself. Do that across enough test files and someone eventually forgets, or instantiates it slightly differently. Playwright’s fixture system removes that step entirely.
Injecting Page Objects with Custom Fixtures
A fixture, in Playwright’s own words, is dependency injection for tests. You already use one every time you write { page } in a test signature. You can extend that same system to hand your test a fully constructed LoginPage automatically, with no manual setup line anywhere.
// fixtures/baseTest.ts
import { test as base } from '@playwright/test';
import { LoginPage } from '../pages/LoginPage';

type Fixtures = {
  loginPage: LoginPage;
};

export const test = base.extend<Fixtures>({
  loginPage: async ({ page }, use) => {
    const loginPage = new LoginPage(page);
    await use(loginPage);
  },
});

export { expect } from '@playwright/test';
Now the test imports from your own fixtures/baseTest instead of @playwright/test directly, and loginPage just shows up, ready to use:
import { test, expect } from '../fixtures/baseTest';

test('user can log in', async ({ loginPage, page }) => {
  await loginPage.navigateTo();
  await loginPage.login('qa_engineer', 'password123');
  await expect(page.getByRole('heading', { name: /dashboard/i })).toBeVisible();
});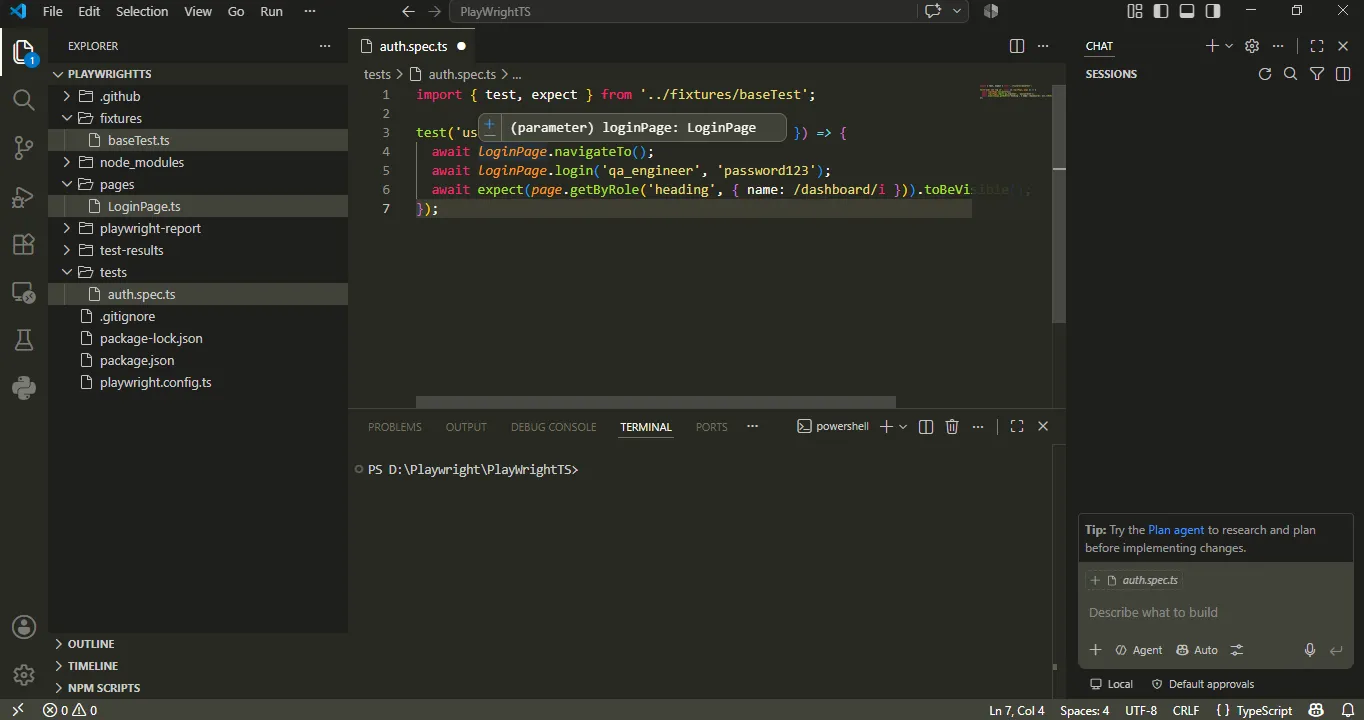
This pattern is what actually scales. Add a DashboardPage, a CheckoutPage, or any other class the same way, register it in the same fixtures file, and every test in your suite can pull in exactly the pages it needs without a single manual instantiation. For a full worked example that builds directly on the LoginPage class above, see Automate a Login Page in a Playwright Framework. Once your framework has more than a couple of these page objects, the next challenge is handling the UI patterns that do not fit neatly into a single click and fill, like content buried in Shadow DOM or a flow that opens a second browser tab.
Handling Real-World UI: Shadow DOM, Multiple Tabs, and Network Mocking
Clean login forms are not what actually breaks test suites. It is the parts of the application that do not behave like a simple page: components hidden inside Shadow DOM, a click that opens a new tab instead of navigating in place, or a third-party API you cannot control the state of. These are the cases where Playwright’s design earns its keep.
Piercing Shadow DOM Automatically
Web components often encapsulate their markup inside a Shadow DOM, which used to mean writing custom traversal logic just to reach an element buried inside one. Playwright’s locators pierce open shadow roots automatically, so you interact with a shadow element the same way you would with anything else on the page.
await page.locator('custom-video-player').getByRole('button', { name: /play/i }).click();No shadow root reference, no manual traversal. If the shadow root is open, this just works.
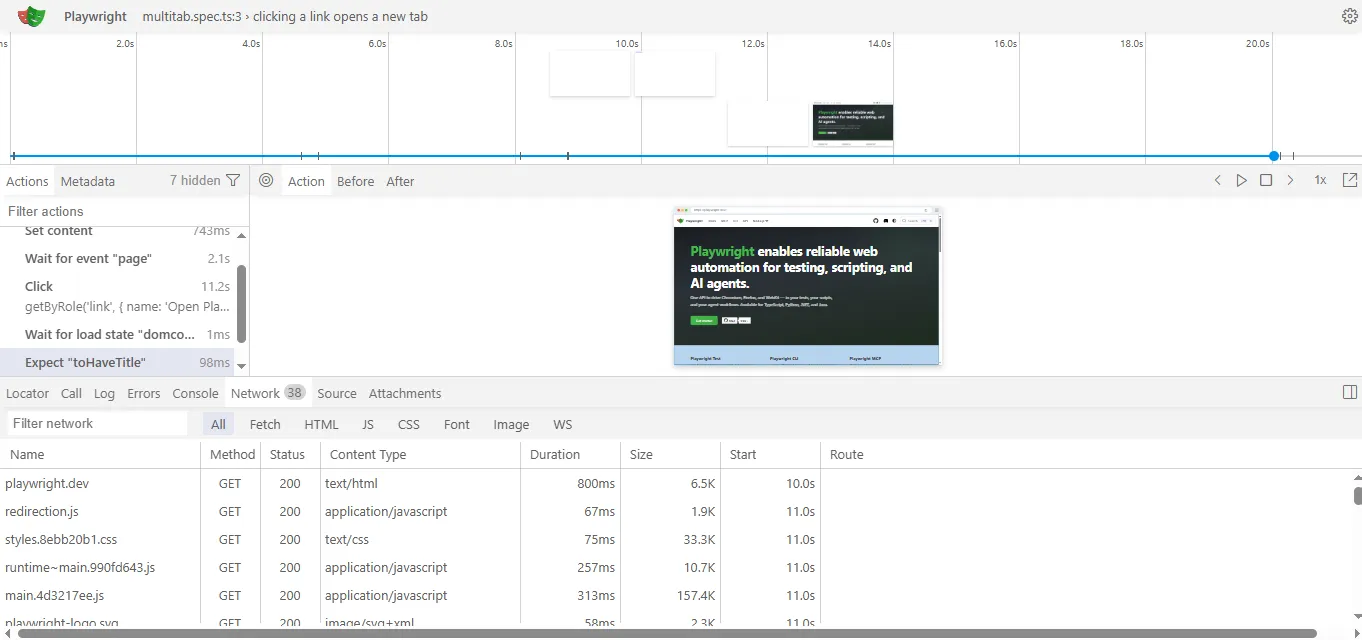
Tracking a New Browser Tab
Some flows, like an “open in new tab” link or an OAuth redirect, spawn a second page instead of navigating the current one. If you do not account for this, your script keeps interacting with the original tab while the actual content loaded somewhere else.
const [newTab] = await Promise.all([
  context.waitForEvent('page'),
  page.getByRole('link', { name: /view terms/i }).click(),
]);

await newTab.waitForLoadState('domcontentloaded');
await expect(newTab.getByRole('heading', { name: 'Terms of Service' })).toBeVisible();
The Promise.all() here matters. You start listening for the new page event and trigger the click in the same step, so you cannot miss the event by starting to listen a moment too late.
Mocking Network Responses
This is the capability I rely on most once a suite matures. Instead of depending on a third-party API being up, fast, and in the right state, you can intercept the request and control exactly what comes back.
test('shows an error state when the API fails', async ({ page }) => {
  await page.route('**/api/v1/metrics', async (route) => {
    await route.fulfill({
      status: 500,
      contentType: 'application/json',
      body: JSON.stringify({ error: 'Internal Server Error' }),
    });
  });

  await page.goto('/metrics-panel');
  await expect(page.getByText(/unable to load metrics panel/i)).toBeVisible();
});
There is no way to reliably trigger a real 500 from a live third-party API on demand, so before page.route(), testing this error state usually meant it just did not get tested. Now it is one route handler.
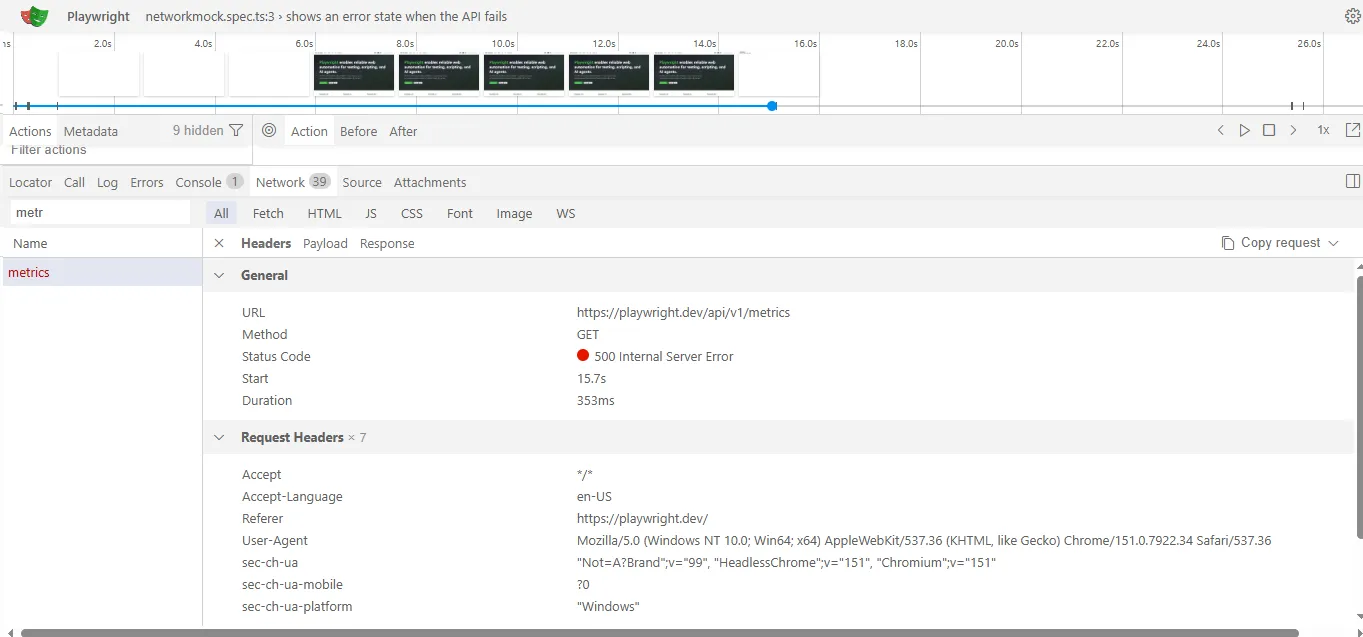
The same method works for testing loading states, empty states, or a slow connection. Route the request, decide what comes back, and your test controls the scenario instead of hoping the real backend cooperates.
These three cases (Shadow DOM, new tabs, and network mocking) cover most of what separates a demo test suite from one that survives contact with a real application. The next thing worth getting right is deciding when a failure should stop the whole test, and when it should not.
Hard vs. Soft Assertions
By default, every assertion in Playwright is a hard assertion. The moment one fails, the test stops right there. That’s the right call when nothing after the failure can be trusted, like a login that never went through.
But not every check deserves that power. Say you are validating a dashboard with six independent metric cards. If the third one has a typo in its label, do you really want the test to skip checking cards four through six? A soft assertion logs the failure and lets the test keep running, so you get a complete picture of what broke instead of stopping at the first thing.
test('dashboard metrics render correctly', async ({ page }) => {
  await page.goto('/dashboard');

  await expect.soft(page.getByRole('heading', { name: /system metrics/i })).toBeVisible();
  await expect.soft(page.getByText('Server Status: Operational')).toBeVisible();

  // A hard assertion still stops the test if something critical fails
  await expect(page.getByRole('button', { name: /download report/i })).toBeEnabled();
});
Both soft assertions run and get reported even if the first one fails. The hard assertion at the end still stops the test immediately if it fails, because a missing download button is not something you want to keep testing around.
I use soft assertions specifically for exactly this shape of test: several independent checks on the same page where one broken label should not hide problems with the other five. For anything sequential, where step two only makes sense if step one succeeded, hard assertions are still the right default. For the full range of built-in matchers beyond the two shown here, see our Playwright TypeScript Assertions reference.
Debugging a Failing Test Locally
When a test fails on your own machine, the fastest path to a fix is UI Mode, not print statements scattered through your test.
npx playwright test --uiThis opens an interactive cockpit: a tree of every test in your suite, a time-travel timeline you can scrub through action by action, a live DOM snapshot for each step, and a locator picker, all in one window. Instead of re-running a test five times to catch what happened at a specific moment, you scrub the timeline once and see it directly.
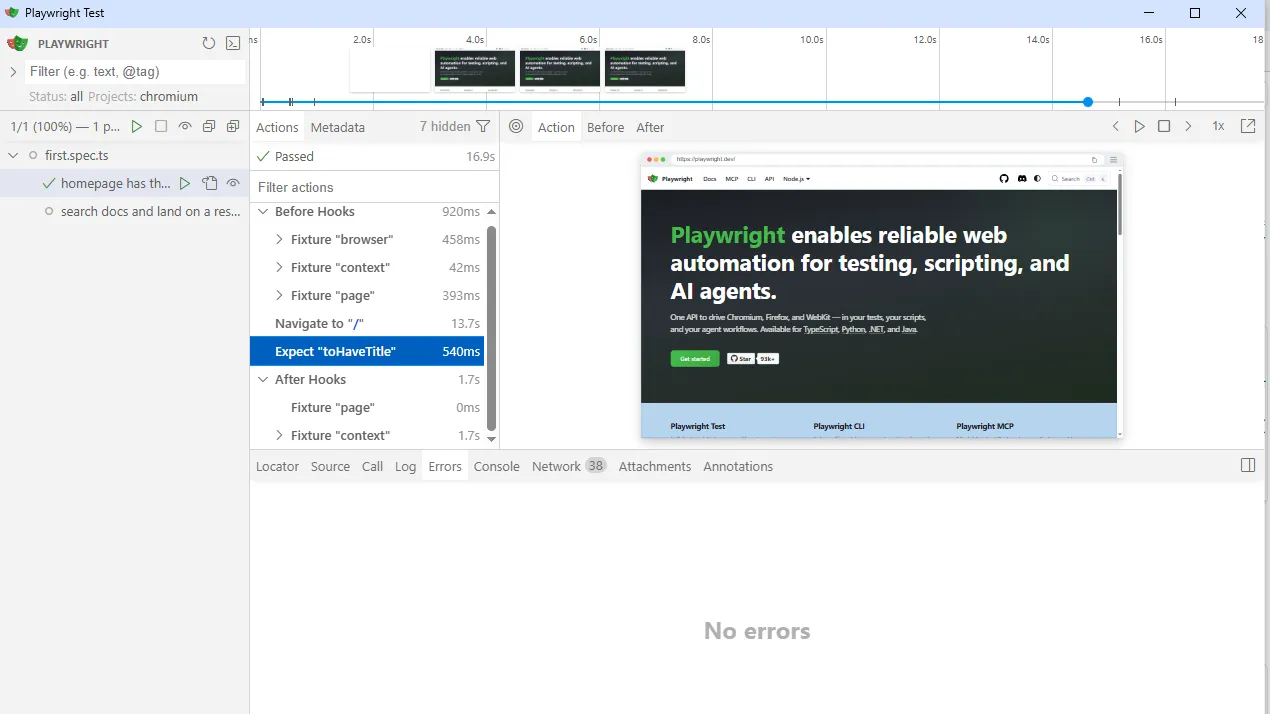
The locator picker inside UI Mode works the same way it does in the Inspector: click any element on the page and it generates the locator Playwright recommends, live against the real DOM. This is the fastest way I know to confirm a locator is matching what you think it’s matching, instead of guessing from the test code alone.
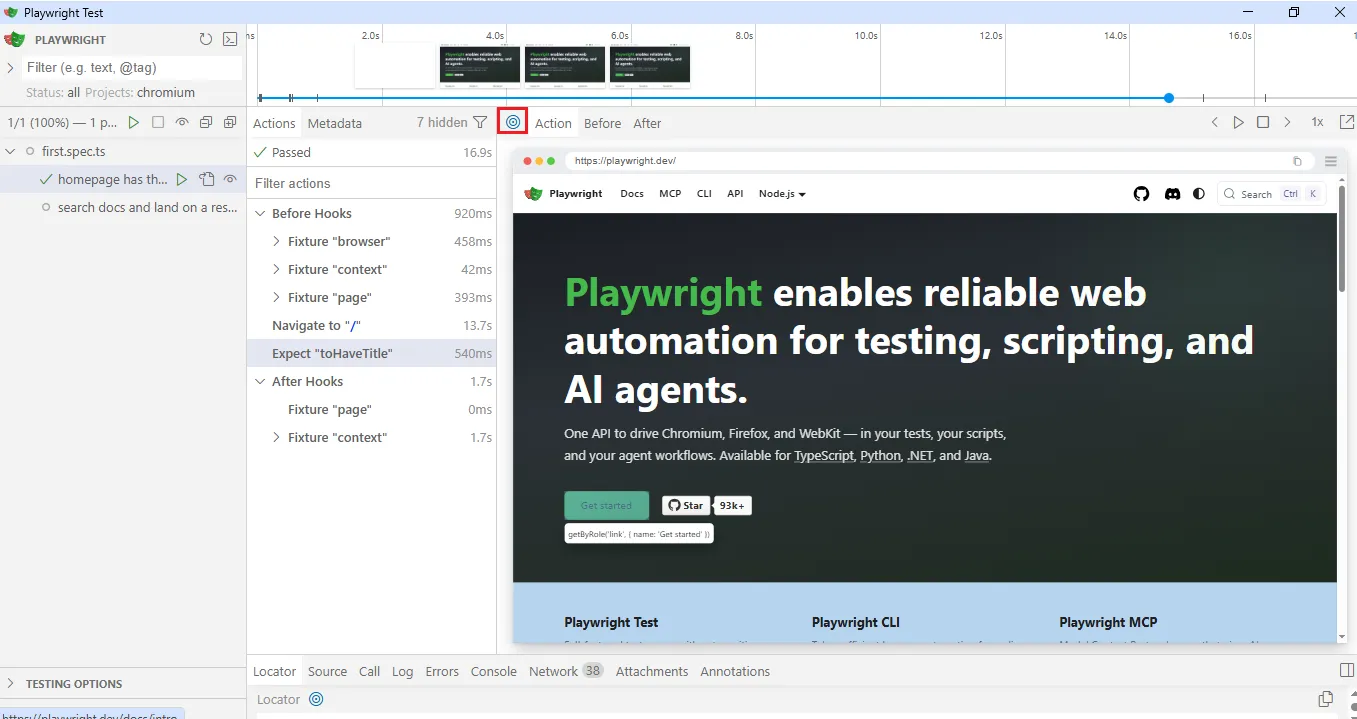
UI Mode also has watch mode, so it re-runs a test automatically the moment you save the file, which makes it the tool I reach for while actively writing or fixing a test, not just diagnosing one.
For the rare case where you need a live breakpoint, actually pausing execution mid-action and stepping forward one line at a time, the older Playwright Inspector still does that, and UI Mode does not:
npx playwright test tests/first.spec.ts --debugI reach for --debug maybe once for every twenty times I reach for --ui, specifically when a single interaction is flaky and I need to freeze the exact moment it breaks. For everyday development and debugging, UI Mode is the default.
Whichever one you use, a failing step almost always comes down to one of three things:
- The locator does not match anything, either because it is too specific, targets the wrong element, or the page markup changed.
- The element exists but is not actionable, meaning it is hidden, covered by something else, or disabled at that point in the flow.
- The test ran ahead of the UI, acting on something before an async operation, like a fetch or an animation, finished.
Both of these tools are built for failures you can reproduce on your own machine. Neither is much use for something that only fails in CI, where you cannot open a live browser and watch it. That is a different debugging problem, and it needs a different tool. For a broader walkthrough of both tools together, see Debug a Test in Playwright.
Debugging Failures That Only Happen in CI
Nearly every Playwright team runs into this eventually: a test passes locally every time, then fails consistently in CI. CI runners are headless, slower, and configured differently than your laptop, so timing issues that never surface locally show up reliably once the test runs on a shared runner.
The fix is not to guess. Turn on trace recording for failed runs in your config:
// playwright.config.ts
export default defineConfig({
  use: {
    trace: 'retain-on-failure',
  },
});
This records a full timeline, but only for tests that actually fail, so you are not generating trace files for thousands of passing tests and burning through CI storage for no reason.
When a test fails in CI, download the trace file from your pipeline’s build artifacts and open it locally:
npx playwright show-trace path/to/trace.zip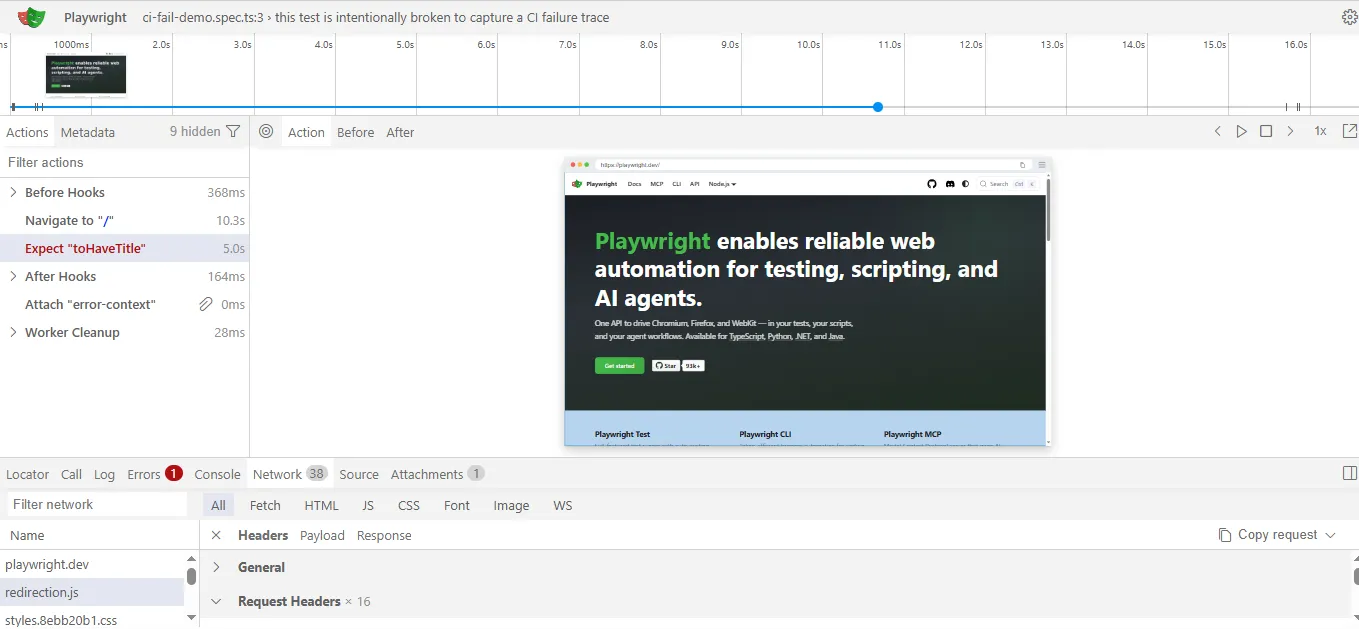
This gives you a DOM snapshot before and after every single action, so you can scrub through the exact moment things went wrong the same way you would step through a video. Alongside that timeline, the Trace Viewer also shows:
- Every network request the page made, with timing and status codes
- Console output and any JavaScript errors that fired during the run
- The exact locator each action targeted, and whether it resolved
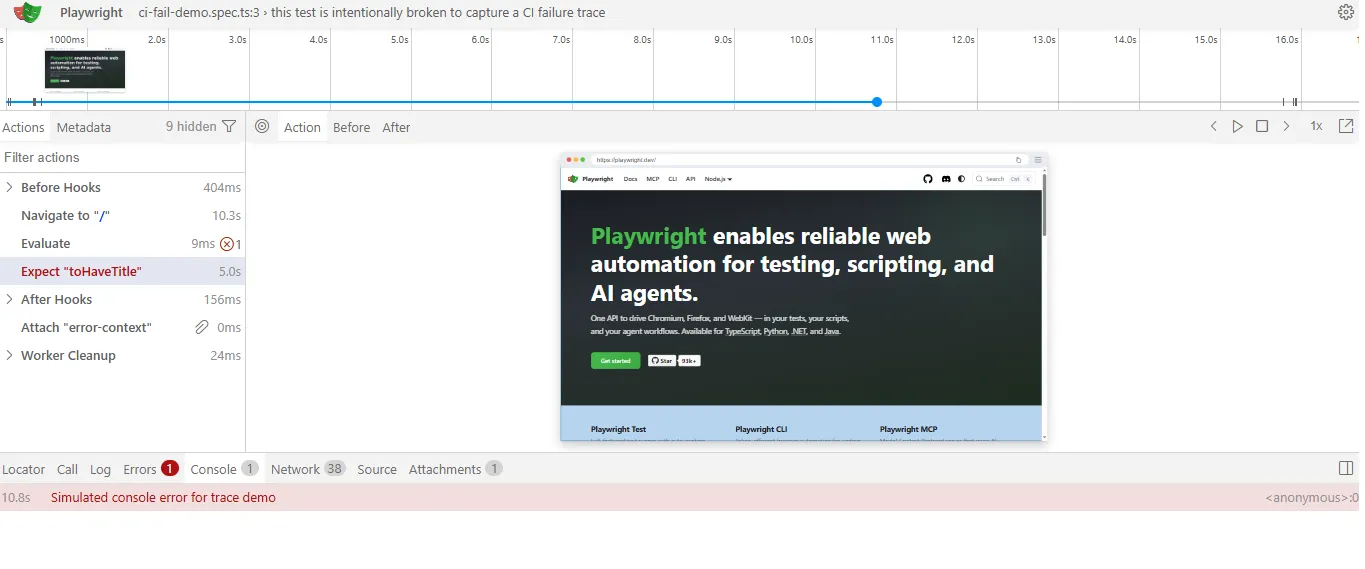
This is the tool that closes the loop on “works on my machine.” You are not reproducing the CI environment to debug it. You are looking at exactly what CI saw, frame by frame, without needing to touch the pipeline again. If your suite fails in CI for reasons beyond what a single trace explains, like flaky infrastructure or environment drift, see Playwright Tests Fail in CI? Fix Common Pipeline Issues.
Common Playwright Errors and How to Fix Them
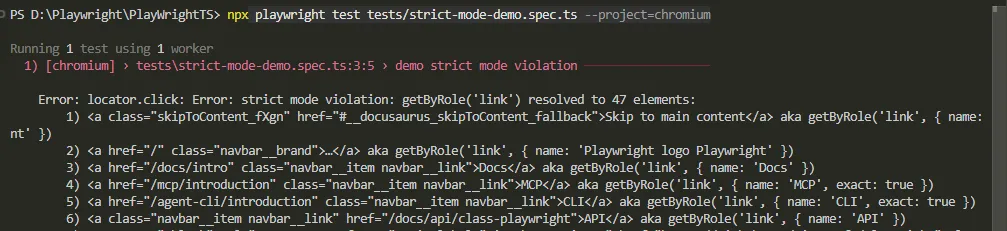
These are the errors I run into most often, across different projects and teams. Most Playwright failures fall into one of these patterns, and the error message is usually specific enough to point you straight at the cause once you know what it’s telling you.
1. Timeout waiting for locator
TimeoutError: locator.click: Timeout 30000ms exceeded.
Call log:
  - waiting for getByRole('button', { name: 'Submit' })
Playwright waited the full timeout and never found a matching, actionable element. Either the element genuinely never renders, or it renders later than the timeout allows. Confirm the locator with the Inspector’s picker first. If the element does appear, just later, wait for it explicitly instead of assuming:
await page.getByRole('button', { name: 'Submit' }).waitFor({ state: 'visible' });
await page.getByRole('button', { name: 'Submit' }).click();
For a deeper breakdown of this specific error, see Playwright Timeout Errors: Fix.
2. Element is not visible
Error: locator.click: Element is not visible
  - element is outside the viewport
The element exists in the DOM, but it’s scrolled out of view or hidden by CSS, and Playwright refuses to act on something a real user couldn’t see either. Scroll it into view first:
await page.getByRole('button', { name: 'Load More' }).scrollIntoViewIfNeeded();
await page.getByRole('button', { name: 'Load More' }).click();
We cover four more real causes of this one in Playwright Element Is Not Visible: 5 Real Fixes.
3. Strict mode violation
Error: locator.click: strict mode violation:
getByText('Continue') resolved to 2 elements
Your locator matched more than one element, and Playwright will not guess which one you meant. This usually means the locator needs to be scoped to a specific parent, not just made more specific in isolation:
// Scope it to the dialog it lives in
await page.getByRole('dialog').getByText('Continue').click();
For the other common causes of this one, see Playwright Strict Mode Violation: Fix in 4 Real Causes.
4. Navigation timeout
TimeoutError: page.waitForURL: Timeout 30000ms exceeded.
Expected URL: "https://app.example.com/dashboard"
Received URL: "https://app.example.com/login"
The page never navigated where the test expected. This is rarely a Playwright problem. It usually means a form submission failed silently, or an auth step didn’t complete. Open the trace and check what the network tab shows the server returned after the submission, rather than assuming the click itself is what’s broken.
5. Cannot read properties of null
TypeError: Cannot read properties of null (reading 'click')This one almost always comes from using page.$() instead of a locator. page.$() returns null immediately if nothing matches, with no retry, and calling .click() on null throws right away.
// Avoid
const button = await page.$('.submit-btn');
await button.click();

// Use a locator instead, which retries automatically
await page.locator('.submit-btn').click();
If you’ve confirmed the locator itself is correct and the element still isn’t found, Why Playwright Cannot Find Element Even When It Exists covers the less obvious causes.
6. Element is intercepted by another element
Error: locator.click: Element is intercepted by another element
  <div class="modal-overlay">
The element you’re targeting is visible and in the right place, but something else, usually a modal or a loading overlay, is sitting on top of it and physically blocking the click. Wait for that overlay to disappear before interacting with what’s underneath it:
await page.locator('.modal-overlay').waitFor({ state: 'hidden' });
await page.getByRole('button', { name: 'Submit' }).click();
None of these six require a workaround or a hack. Each one has a direct, permanent fix once you know what the error is describing. The pattern worth internalizing is broader than any single fix: the locator isn’t matching the right element, the action ran before the UI was ready, or the application never reached the state the test assumed it would. Once you can sort a failure into one of those three buckets, finding the fix gets a lot faster.
Authentication and Session Management
If every test in your suite logs in through the UI before it does anything else, you are paying for that login flow hundreds of times over. At even a modest 200 tests, a few seconds of login time per test adds minutes to every CI run, and it makes every single test depend on your login page working, whether or not login is what that test is about.
Playwright’s storageState solves this by letting you log in once, save the resulting session, and have every other test start already authenticated. The code below uses placeholder values, your own login URL, field labels, and credentials, swap those for your actual app before running it.
Step 1: Log In Once and Save the Session
Create a setup file that performs the login and saves the result:
// tests/setup/auth.setup.ts
import { test as setup } from '@playwright/test';

setup('authenticate', async ({ page }) => {
  await page.goto('/login');
  await page.getByLabel('Email').fill('qa_engineer@example.com');
  await page.getByLabel('Password').fill('TestingIsAwesome123!');
  await page.getByRole('button', { name: 'Sign in' }).click();
  await page.waitForURL('/dashboard');

  await page.context().storageState({ path: 'playwright/.auth/user.json' });
});
Step 2: Have Your Other Tests Load That State
In playwright.config.ts, define the setup as its own project, then make your real test project depend on it and load the saved session:
export default defineConfig({
  projects: [
    {
      name: 'setup',
      testMatch: /auth\.setup\.ts/,
    },
    {
      name: 'authenticated tests',
      dependencies: ['setup'],
      use: {
        storageState: 'playwright/.auth/user.json',
      },
    },
  ],
});
Every test in the authenticated tests project now starts with a browser context that already has the session loaded. There is no login step inside the test itself. (The screenshot below is from a separate demo project used to capture this exact ordering, project names differ, but the setup-runs-first pattern is identical.)

The saved file itself is just cookies and origin-scoped storage:
{
  "cookies": [ /* ... */ ],
  "origins": [
    {
      "origin": "https://app.example.com",
      "localStorage": [ /* ... */ ]
    }
  ]
}
It contains live session tokens, so add it to .gitignore immediately:
playwright/.auth/In CI, the setup project regenerates this file fresh at the start of every run, so you are never committing a stale or shared session into version control.
Testing With More Than One User Role
Some flows genuinely need two different logged-in users at once, like verifying that an admin can see something a regular user cannot. Save a separate state file per role, then open two browser contexts in the same test:
test('admin sees content a regular user cannot', async ({ browser }) => {
  const adminContext = await browser.newContext({
    storageState: 'playwright/.auth/admin.json',
  });
  const userContext = await browser.newContext({
    storageState: 'playwright/.auth/user.json',
  });

  const adminPage = await adminContext.newPage();
  const userPage = await userContext.newPage();

  await adminPage.goto('/admin');
  await expect(adminPage.getByText('Admin Panel')).toBeVisible();

  await userPage.goto('/admin');
  await expect(userPage.getByText('Access denied')).toBeVisible();

  await adminContext.close();
  await userContext.close();
});
Each context is fully isolated, so the admin session and the regular user session never leak into each other, even though both are running in the same test. For patterns that go further, like testing token expiry or role-based access controls, see Playwright Auth / Security Testing.
With locators, Page Objects, and authenticated sessions all in place, the last piece is pulling everything into a playwright.config.ts that is ready for a real CI pipeline instead of the default one Playwright scaffolds for you.
Building a Production-Ready Config
The config Playwright generates on install runs tests fine, but it is not configured for the way a real pipeline behaves. Here is the version I use as a starting point on real projects, with every setting tied to something covered earlier in this tutorial.
Before pasting this in, install the two packages it depends on:
npm i dotenv
npm i --save-dev @types/node
The first gives you the dotenv import itself. The second is easy to miss: process.env is a Node.js global, and without @types/node installed, TypeScript will throw Cannot find name 'process' the moment you use it, even though the code is otherwise correct.
import { defineConfig, devices } from '@playwright/test';
import dotenv from 'dotenv';
import path from 'path';

dotenv.config({ path: path.resolve(__dirname, '.env') });

export default defineConfig({
  testDir: './tests',
  fullyParallel: true,
  forbidOnly: !!process.env.CI,
  retries: process.env.CI ? 2 : 0,
  workers: process.env.CI ? '100%' : undefined,
  reporter: [
    ['html', { open: 'never' }],
    ['json', { outputFile: 'playwright-report/results.json' }],
  ],
  use: {
    baseURL: process.env.BASE_URL,
    trace: 'retain-on-failure',
    screenshot: 'only-on-failure',
    video: 'retain-on-failure',
    actionTimeout: 15000,
    navigationTimeout: 30000,
  },
  projects: [
    { name: 'setup', testMatch: /.*\.setup\.ts/ },
    {
      name: 'chromium',
      use: { ...devices['Desktop Chrome'], storageState: 'playwright/.auth/user.json' },
      dependencies: ['setup'],
    },
    {
      name: 'firefox',
      use: { ...devices['Desktop Firefox'], storageState: 'playwright/.auth/user.json' },
      dependencies: ['setup'],
    },
    {
      name: 'webkit',
      use: { ...devices['Desktop Safari'], storageState: 'playwright/.auth/user.json' },
      dependencies: ['setup'],
    },
  ],
});
A few of these choices are worth explaining rather than just copying:
retries: process.env.CI ? 2 : 0– retries are on in CI only. Retrying locally just hides a problem you should be fixing right now. In CI, they absorb infrastructure noise, like a runner that briefly stalled, without you having to manually re-trigger the whole pipeline.forbidOnly: !!process.env.CI– if anyone accidentally commitstest.only()while debugging, this fails the CI build instead of silently letting the rest of your suite skip execution in deployment.trace: 'retain-on-failure'– this is the setting from the CI debugging section earlier. It only records for tests that fail, so you get full traces without paying the storage cost across every passing test.workers: process.env.CI ? '100%' : undefined– lets Playwright use all available cores in CI, while leaving your local machine to its own default so it is not competing with everything else running on your laptop.dependencies: ['setup']– this is the auth pattern from the previous section, wired directly into the config so every browser project automatically waits for the login setup to run first, and starts already authenticated.screenshot: 'only-on-failure'andvideo: 'retain-on-failure'– the same reasoning as trace, applied to two more artifact types. Both cost disk space, so both are scoped to failures only, and both get pulled into your CI artifacts alongside the trace when something breaks.
Nothing here is exotic. Every setting maps directly to a real failure mode this tutorial has already walked through: flaky retries, storage bloat, wasted CI minutes, or a login step nobody wants to repeat five hundred times a day. That is really what a “production config” means. It is not more settings, it is settings chosen for reasons you can actually explain.
Testing on Mobile Viewports
The same projects array that runs your suite across Chromium, Firefox, and WebKit can also run it against emulated mobile viewports, using Playwright’s built-in device profiles:
import { devices } from '@playwright/test';

projects: [
  // ...your existing desktop projects
  {
    name: 'Mobile Chrome',
    use: { ...devices['Pixel 7'] },
  },
  {
    name: 'Mobile Safari',
    use: { ...devices['iPhone 14'] },
  },
],
This is worth being precise about: it’s emulation, not real device testing. Playwright sets the viewport size, user agent, and touch support to match the device profile, which is genuinely useful for catching responsive layout bugs, but it’s still Chromium or WebKit under the hood, not the actual mobile browser engine running on real hardware. If your suite needs to validate against real devices, that requires pairing Playwright with a device cloud. For the deeper walkthrough, including which device profiles are available and how to handle touch-specific interactions, see Mobile Testing in Playwright.
Running Tests in Parallel Across CI with Sharding
Even with fullyParallel: true, a large suite running on one CI runner is still limited by that single machine’s CPU cores. Sharding splits your test suite across multiple runners at once, so a suite that takes 40 minutes on one machine can run in a fraction of that across four. If your suite is still small enough that sharding is overkill, Run Playwright Tests on GitHub Actions covers the simpler, single-job setup.
Here is a GitHub Actions workflow that shards the suite across 4 parallel jobs, then merges the results into one report. This assumes your project is already in a Git repository connected to GitHub, if it isn’t yet, run git init, create an empty repository on GitHub, then git remote add origin <your-repo-url> and git push -u origin main before continuing. The workflow file itself goes at .github/workflows/playwright.yml, relative to your project root, create the .github and workflows folders if they don’t already exist:
# .github/workflows/playwright.yml
name: Playwright Tests

on:
  push:
    branches: [main]
  pull_request:
    branches: [main]

jobs:
  test:
    timeout-minutes: 40
    runs-on: ubuntu-latest
    strategy:
      fail-fast: false
      matrix:
        shardIndex: [1, 2, 3, 4]
        shardTotal: [4]
    steps:
      - uses: actions/checkout@v5
      - uses: actions/setup-node@v6
        with:
          node-version: 22
      - run: npm ci
      - run: npx playwright install --with-deps chromium
      - run: npx playwright test --shard=${{ matrix.shardIndex }}/${{ matrix.shardTotal }}
      - uses: actions/upload-artifact@v7
        if: always()
        with:
          name: blob-report-${{ matrix.shardIndex }}
          path: blob-report/
          retention-days: 2

  merge-reports:
    if: always()
    needs: [test]
    runs-on: ubuntu-latest
    steps:
      - uses: actions/checkout@v5
      - uses: actions/setup-node@v6
        with:
          node-version: 22
      - run: npm ci
      - uses: actions/download-artifact@v8
        with:
          path: all-reports
          pattern: blob-report-*
          merge-multiple: true
      - run: npx playwright merge-reports --reporter=html ./all-reports
      - uses: actions/upload-artifact@v7
        with:
          name: playwright-report
          path: playwright-report/
          retention-days: 14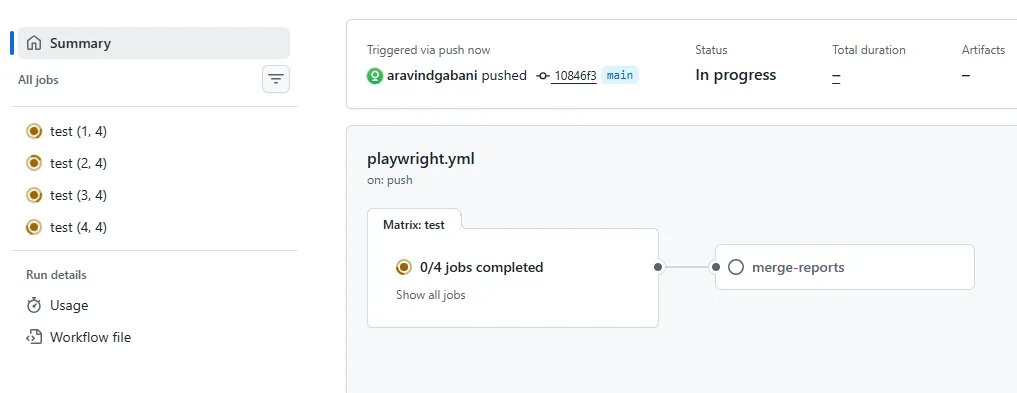
The --shard flag is what splits the work. shard=1/4 means “run the first quarter of the test files,” and Playwright divides the suite evenly across however many shards you configure. Each shard runs as its own job, on its own runner, with fail-fast: false making sure one shard’s failure doesn’t cancel the other three mid-run.
Because each shard only has its own slice of results, the second job merges them back into a single HTML report once every shard finishes, so you are not stuck opening four separate reports to see the full picture.
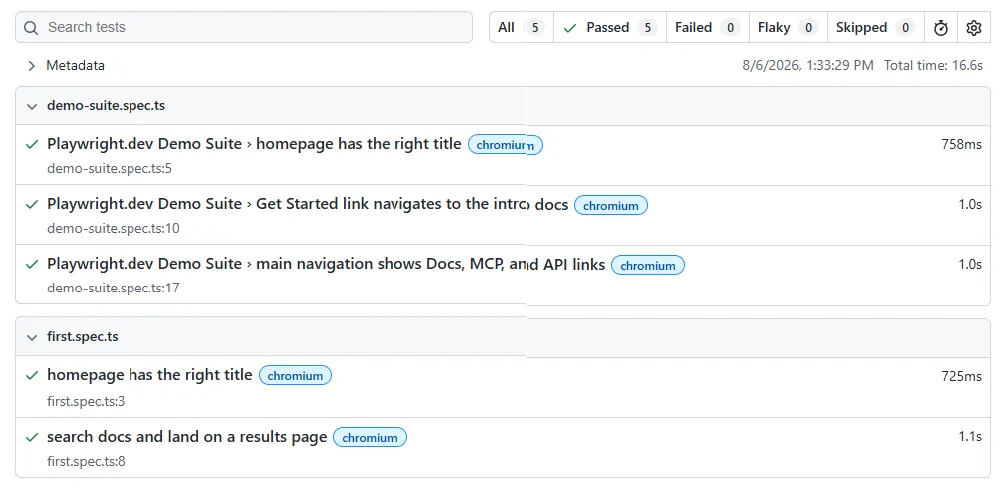
This is the same trace: 'retain-on-failure' and retries config from the previous section working exactly as intended here. Any test that fails gets its trace retained, uploaded as part of that shard’s artifacts, and ready to open the moment CI flags it, without you needing to touch the pipeline itself.
A Quick Checklist Before You Ship a Playwright Suite
I run through this list myself before I call any Playwright suite done. Nothing here is new, it’s just the condensed version of everything above:
- Locators target roles, labels, and text, not CSS classes or XPath. If a locator would break from a pure visual redesign with no behavior change, it’s too tightly coupled to markup.
- No
page.waitForTimeout()anywhere in the suite. Every wait should be tied to a real condition: visibility, a URL change, a network response. - Every test is self-contained. No test depends on another test having run first, or on data another test left behind. Order should never matter.
- Authentication happens once, in setup, not inside every test. If your suite logs in through the UI more than once per browser project, that’s the first thing to fix.
trace: 'retain-on-failure', nottrace: 'on'. Recording traces for every passing test burns storage for no benefit.- Retries are enabled in CI and disabled locally. A test that only passes on retry locally is a test you’re choosing to ignore.
- Soft assertions are the exception, not the default. Reach for them specifically for independent checks on one page, and use hard assertions everywhere else.
If your suite already does all seven, you are ahead of most teams I have audited. If it does not, that gap is usually exactly why the suite feels unreliable, no matter how much code has been written to work around it.
Frequently Asked Questions
What is Playwright and why should I use it?
Playwright is an open-source browser automation and testing framework built by Microsoft. It runs a single set of test scripts across Chromium, Firefox, and WebKit, communicating directly with the browser engine instead of through a driver, which is what makes it faster and less prone to the flaky-test problems older tools struggle with.
Is Playwright free to use?
Yes. Playwright is completely free and open source under the Apache 2.0 license. There’s no paid tier for the framework itself.
Which programming languages does Playwright support?
JavaScript, TypeScript, Python, Java, and .NET, with the same core capabilities across all of them. A team isn’t locked into one language just because they chose Playwright.
How do I install Playwright?
Run npm init playwright@latest in a Node.js project (Node 22 or higher). It walks you through a few setup choices and scaffolds a working project, including sample tests and browser binaries, in one step.
Can Playwright tests run in CI/CD pipelines?
Yes, and it’s built for this. Playwright has native support for parallel execution and test sharding across multiple CI jobs, plus built-in trace, screenshot, and video capture for diagnosing failures that only happen in CI.
Is Playwright better than Selenium or Cypress?
It depends on what you need. Playwright’s direct browser connection makes it faster than Selenium’s WebDriver-based architecture, and it supports true multi-tab and cross-browser testing in ways Cypress doesn’t. That said, Selenium still has the broadest browser and language ecosystem, and Cypress has a strong developer experience for single-origin frontend testing. For most new cross-browser end-to-end automation, Playwright is the stronger default today.
Is Playwright beginner-friendly?
Yes. The API is straightforward, and features like Codegen (which records your clicks and generates working test code) and UI Mode (which shows you exactly what a test did, step by step) make it easier to get started than older automation tools, even without deep JavaScript experience.
Does Playwright support mobile testing?
It supports mobile browser emulation, matching a real device’s viewport, user agent, and touch behavior, using built-in device profiles. It does not automate native mobile apps or run on real device hardware directly; that requires pairing it with a third-party device cloud.
Closing Thoughts
I opened this Playwright automation tutorial talking about the years I spent treating flaky tests as normal. They aren’t, and once you’ve worked with a framework that talks directly to the browser instead of relaying commands through a driver, going back to the old way is hard to justify.
Everything in this tutorial reflects how I actually approach Playwright testing on real projects: the architecture that makes Playwright fast, locators that survive a redesign, Page Objects and fixtures that scale past a handful of files, the edge cases that break simpler frameworks, and the errors you will genuinely hit once this is running in CI against a real application.
Start with the first test in this tutorial if you haven’t already. Everything after it builds on that same foundation, one piece at a time. Once this framework is running in a real project, our Enterprise Playwright Automation Framework series picks up from here, going into self-healing locators, retry mechanisms, and reporting at scale.