Last updated on January 3rd, 2026 at 03:11 am
In this Playwright Java tutorial for beginners, we’ll show you how to get started with Playwright Java step by step. This guide is designed for test automation engineers and Java developers who want to perform automated testing with Playwright in Java quickly and effectively. You’ll learn the complete setup process, how to write your first test, and how Playwright makes browser automation in Java simple and powerful.
By the end of this guide, you’ll have working examples of Playwright automation in Java that you can run in Eclipse or from the command line. This makes it easier for beginners to start automating web applications with confidence.
For enterprise-level Playwright automation in Java, refer to this Enterprise Playwright Automation Framework that demonstrates a scalable TestNG-driven framework design.
- Key Benefits of Playwright Java
- Quick Links for Playwright Java Tutorials
- Getting Started with Playwright Java
- Step-by-Step Setup for Playwright Java
- Writing Your First Playwright Java Test
- Locating Elements in Playwright Java
- Advanced Playwright Java Features With Examples
- Playwright Java vs Selenium
- Conclusion
Key Benefits of Playwright Java
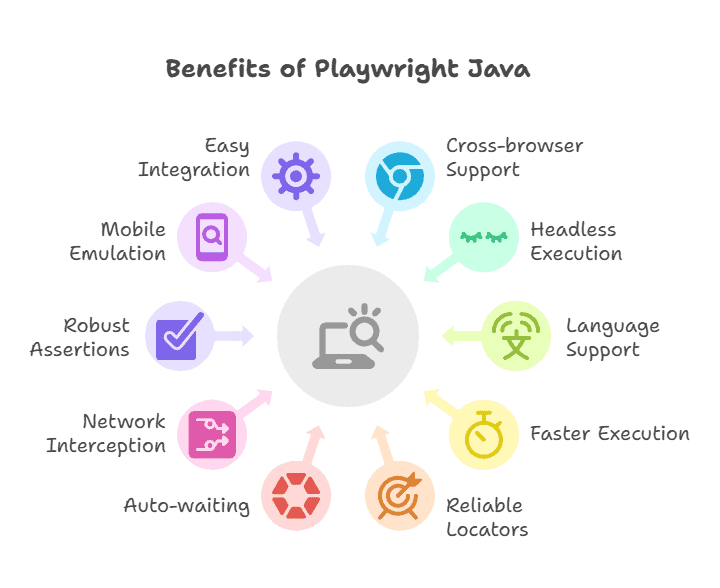
Playwright Java provides several advantages for testers and developers:
- Cross-browser testing support: Run the same test on Chromium, Firefox, and WebKit.
- Headless and headed execution: Choose between faster headless runs or full browser sessions for debugging.
- Multiple Language Support: You can write playwrite automated tests across multiple supported languages like JavaScript / TypeScript (Node.js), Python, Java, and C# (.NET).
- Faster execution: Built-in parallel test execution reduces test run time.
- Reliable locators: Use powerful selectors like getByRole and getByText.
- Auto-waiting for elements: Playwright automatically waits for elements to load before interacting, reducing flakiness.
- Network interception: Monitor and modify network requests for advanced testing scenarios.
- Robust assertions: Playwright provides built-in assertions(e.g., toBeVisible, toBeEnabled, toBeChecked) through its expect function, which is integrated directly into the Playwright Test runner.
- Parallel execution: Speed up testing by running multiple tests at the same time.
- Browser automation in Java: Write end-to-end web automation tests without switching to another language.
- Mobile emulation: Simulate mobile devices and test responsive designs directly from Java.
- Easy integration: Works with Maven, Gradle, and popular CI/CD tools.
With these features, Playwright with Java is more than just a testing tool; it’s a complete solution for automation and browser interaction.
Quick Links for Playwright Java Tutorials
- Installation & Recording
- Locators
- Basic Actions
- Playwright Java Get Page Title
- Playwright Click an Element
- Playwright Java Double Click Action (Using page.dblclick and page.mouse().dblclick(x, y))
- Perform Right-Click Playwright in Java
- How to Handle Text Box in Playwright Java
- Playwright Java Select DropDown Values (By Value, Label, and Index)
- Handle Checkbox In Playwright Java
- Handle dynamic tables in Playwright Java
- Playwright Java Calendar Automation
- Handle Alerts In Playwright Java
- Scroll In Playwright Java (scrollIntoViewIfNeeded, Keyboard-Based, Mouse Wheel Scroll)
- Playwright Capture Screenshot (Visible Page, Full Page, Element, on Test Failure, Masked, and Other Screenshot options)
- Record Playwright Java Test Videos
- Playwright Integration With Other Tools
- Browser and Context Management
- AI
- Playwright Tutorials With Other Languages
Getting Started with Playwright Java
Before you can start automating tests using Playwright, you’ll need to set up Java in your development environment. The process is straightforward if you meet the basic requirements and follow the right steps.
Prerequisites
To run Playwright smoothly in Java projects, make sure your system meets these requirements:
- Java Development Kit (JDK): Version 11 or higher is required. Older versions may not support the latest Playwright features.
- You can download the latest JDK and install it if it’s not already on your system.
- Apache Maven: Version 3.6.0 or above is recommended for dependency management.
- IDE (Integrated Development Environment): To write and run Playwright tests in Java, you need an IDE such as IntelliJ IDEA or Eclipse IDE for Java Developers.
- Download Eclipse or download IntelliJ IDEA , whichever you prefer. (I personally recommend Eclipse IDE.)
- System Memory: At least 8 GB RAM for reliable performance when running multiple browser instances.
- Disk Space: A minimum of 1 GB free space to store browser binaries that Playwright downloads automatically.
- Operating System: Compatible with Windows 10+, macOS 11+, and modern Linux distributions.
Step-by-Step Setup for Playwright Java
Follow these steps to set up Playwright Java in Eclipse:
Step 1: Download & Install Java Development Kit (JDK)
- Visit the official Oracle JDK download page.
- Download the installer for your operating system (Windows, macOS, or Linux).
- Run the installer and follow the setup wizard.
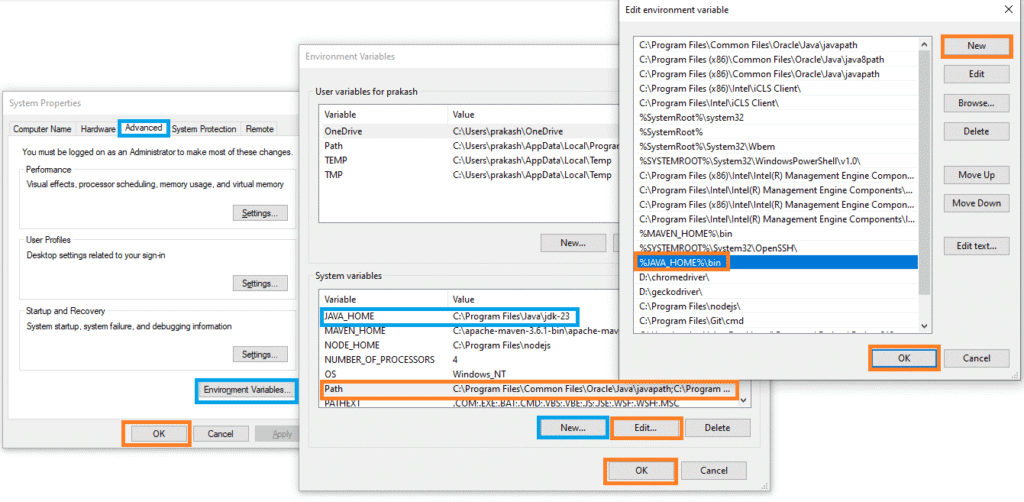
- Set Environment variables:
- Search advanced system settings from the Windows Start menu >> Select View advanced system settings. It will open the system properties dialog box.
- Navigate to the advanced tab and click on the Environment Variables button. It will open the Environment Variables dialog box.
- Click on the New button to add a new system variable JAVA_HOME with value = java installation path (e.g., C:\Program Files\Java\jdk-23).
- Edit the Path system variable and add a new entry, and set the Java bin path to ‘%JAVA_HOME%\bin‘
- Close all dialog boxes by clicking on the OK button.
- After installation, verify Java by running the following command in your terminal/command prompt:
java -version
You should see version 11 or higher displayed.
Step 2: Download & Install Apache Maven
- Go to the Apache Maven download page.
- Download the binary zip archive for your operating system.
- Extract the archive to a folder (e.g., C:\Program Files\Maven on Windows).
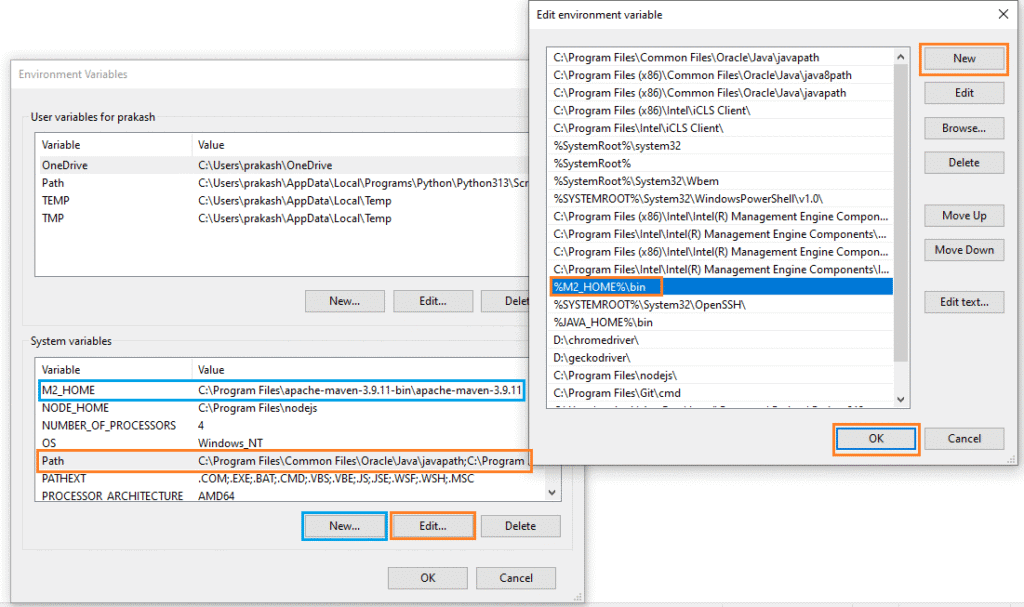
- Set the M2_HOME environment variable to point to the Maven folder.
- Add Maven’s bin directory to your system’s PATH.
- Verify the installation by running:
mvn -version
This should display the installed Maven version.
Step 3: Install Eclipse IDE
To write and run Playwright tests in Java, you need an Integrated Development Environment (IDE). The most common and beginner-friendly choice is Eclipse IDE for Java Developers.
Installation Steps:
- Download Eclipse IDE:
- Visit the Eclipse Downloads Page
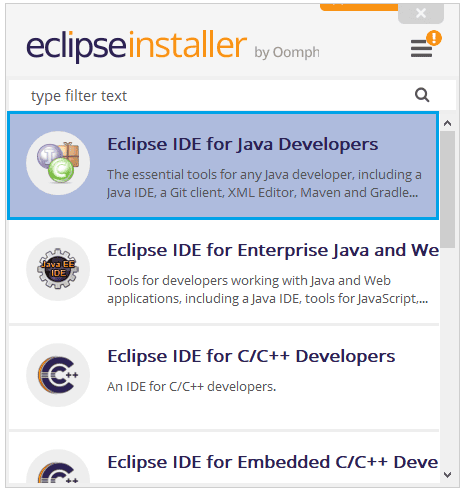
- Choose “Eclipse IDE for Java Developers”.
- Run the Installer:
- Launch the installer and select Eclipse IDE for Java Developers.
- Choose the installation path and click Install.
- Verify Installation:
- Open Eclipse after installation.
- Go to Help > About Eclipse IDE to confirm the installed version.
Step 4: Create a Maven Project in Eclipse
Playwright Java relies on Maven for dependency management. Once Eclipse is installed, follow these steps:
- Open the Eclipse IDE and go to File > New > Project.
- In the wizard, select: Maven > Maven Project > Click Next.
- Check “Create a simple project (skip archetype selection)” > Click Next.
- Fill in project details:
- Group Id: com.playwright
- Artifact Id: playwright-automation
- Version: 1.0.0
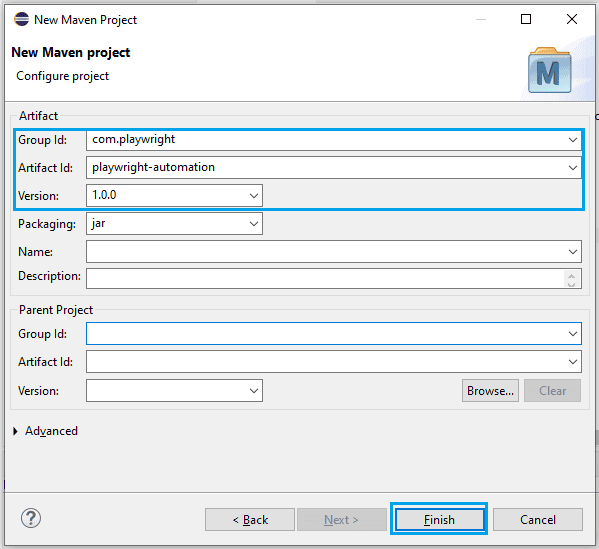
- Click Finish.
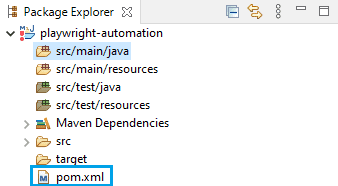
- Eclipse will create a basic Maven project with a pom.xml file.
- You will later add the Playwright dependencies for Java to this file.
For broader test coverage, you can read my article on running Playwright tests in cloud environments which explains device clouds, parallel testing and CI CD setup for beginners.
Step 5: Add Playwright Dependency
To use Playwright with Java, we need to add the Playwright dependency in our project’s pom.xml file. Dependencies in Maven act like building blocks; they automatically download the required libraries from the Maven Central Repository, so we don’t have to manage JAR files manually.
For Playwright, adding this dependency allows us to use important classes such as Playwright, Browser, and Page in our test scripts. Without it, our project won’t recognize Playwright commands and will show compilation errors.
Add the following dependency inside your project’s pom.xml:
<dependencies>
  	<dependency>
    	<groupId>com.microsoft.playwright</groupId>
    	<artifactId>playwright</artifactId>
    	<version>1.55.0</version>
		</dependency>
</dependencies>
Or you can get the latest version from the official Maven repository page.
Once added, Maven will automatically fetch Playwright version 1.55.0 (released in August 2025) along with all its supporting libraries, making it ready to use in your Java project.
Writing Your First Playwright Java Test
After setting up the project and adding the Playwright dependency, let’s write our first simple test.
Writing First Playwright Java Test
Inside the src/main/java folder, create a new Java class named FirstTest.java in the package com.playwright.demo, and check the option public static void main(String[] args) while creating the class.
- Right-click the src/main/java folder >> select New >> Class. This will open the New Java Class dialog.
- Set the Package Name as com.playwright.demo.
- Set the Class Name as FirstTest.java.
- Check the option public static void main(String[] args).
- Click Finish to create the class.
![new-java-class-dialog-eclipse-playwright | Software Testing Tutorials New Java Class dialog in Eclipse with package com.playwright.demo, class FirstTest.java, and public static void main(String[] args) selected](https://sp-ao.shortpixel.ai/client/to_webp,q_lossy,ret_img,w_531,h_631/https://software-testing-tutorials-automation.com/wp-content/uploads/2025/08/new-java-class-dialog-eclipse-playwright.png)
Here’s an example of a simple Playwright Java test. Now, you can copy and paste the example test code below into the newly created FirstTest.java file.
Example Playwright Java Test: Navigate, Take Screenshot
package com.playwright.demo;

import com.microsoft.playwright.*;

public class FirstTest {
public static void main(String[] args) {
try (Playwright playwright = Playwright.create()) {
Browser  browser = playwright.chromium().launch(new BrowserType.LaunchOptions().setHeadless(false));
Page page = browser.newPage();

        // Navigate to Playwright website
        page.navigate("https://playwright.dev");

        // Print page title
        System.out.println("Page Title: " + page.title());

        // Take screenshot
        page.screenshot(new Page.ScreenshotOptions().setPath(java.nio.file.Paths.get("screenshot.png")));

        browser.close();
    }
}
}
Short Explanation of the Script
- Playwright.create() starts a new Playwright session.
- browser.newPage() opens a new browser tab.
- page.navigate() loads the given URL.
- page.title() fetches the current page title.
- page.screenshot() captures a screenshot of the page and saves it under the project folder playwright-automation
- Finally, browser.close() closes the browser session.
Running First Playwright Java Test
There are two options to run the test.
1. Run the Test in Eclipse
- Make sure your FirstTest.java file is saved.
- Right-click the FirstTest.java file in Package Explorer.
- Select Run As >> Java Application.
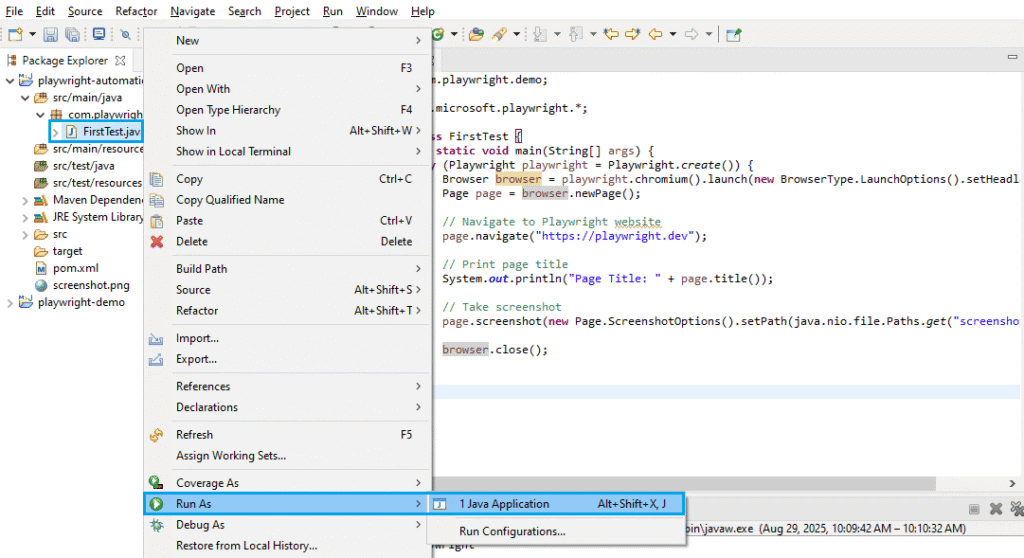
- Eclipse will compile and execute the code.
- You should see:
- The browser opens (Chromium, Firefox, or WebKit).
- Page navigates to https://playwright.dev.
- Title prints in the Console.
- Screenshot (screenshot.png) is saved in your project folder.
Tip: If you encounter compilation errors, ensure that Maven dependencies are added and the project is updated (Right-click Project > Maven> Update Project).
2. Run the Test from Command Prompt
- Open Command Prompt.
- Navigate to your Maven project root (where pom.xml is located) folder:
- cd D:\path\to\your\playwright-automation
- Compile and run your Java class with the Maven exec plugin:
- mvn compile exec:java -Dexec.mainClass=”com.playwright.demo.FirstTest”
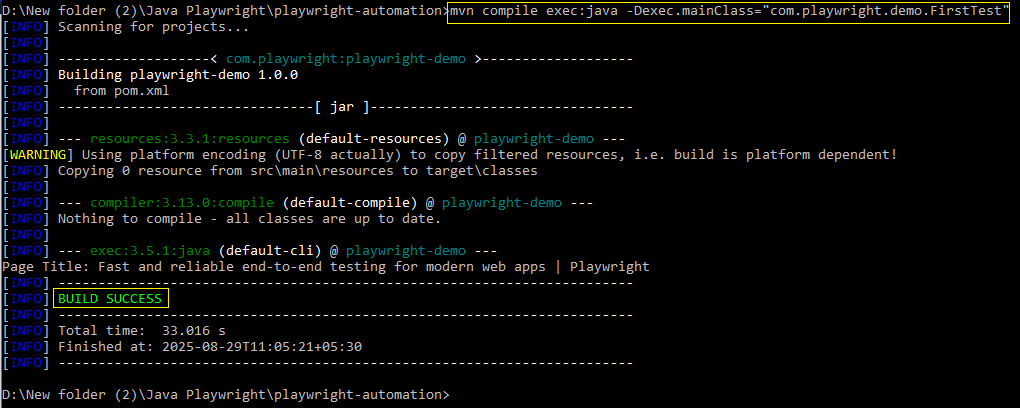
- You should see the same results as in Eclipse:
- The browser opens.
- Page navigates and prints the title in the console.
- Screenshot is generated.
Tip: Make sure Maven is installed and added to PATH; otherwise, you’ll see ‘mvn’ is not recognized as an internal or external command.
Locating Elements in Playwright Java
One of the biggest advantages of Playwright automation in Java is its modern locator strategy. Unlike traditional Selenium, where you mostly depend on XPath or CSS selectors (which can break if the UI changes), Playwright provides flexible and reliable element locators designed for testing real user interactions.
These locators are built around accessibility standards and user-facing attributes, making your tests easier to read, maintain, and scale.
Common Locators in Playwright Java for UI Automation
Here are some of the most commonly used locators in Playwright Java:
getByRole: Locates elements by their ARIA role (e.g., button, textbox, link).
page.getByRole(AriaRole.BUTTON, new Page.GetByRoleOptions().setName("Submit")).click();getByText: Finds elements based on visible text content.
page.getByText("Login").click();getByLabel: Targets input fields or form elements linked with a label.
page.getByLabel("Username").fill("demoUser");getByPlaceholder: Selects input fields by placeholder text.
page.getByPlaceholder("Enter password").fill("MySecret123");getByTestId: Finds elements using the data-testid attribute (recommended for stable tests).
page.getByTestId("login-button").click();Using these Playwright Java locators makes your test scripts more robust and future-proof, since they rely on meaningful attributes instead of fragile selectors.
Advanced Playwright Java Features With Examples
Playwright Java is not just about basic navigation or clicking elements. It comes with advanced features for browser automation in Java, making it suitable for real-world projects and scalable test automation frameworks.
Parallel Test Execution
Run multiple test cases at the same time to speed up execution. This is especially useful in CI/CD pipelines.
Here is an example to run tests in parallel using JUnit5 in Playwright Java
Parallel Test Execution Example
package com.playwright.demo;

import com.microsoft.playwright.*;
import org.junit.jupiter.api.*;

@TestInstance(TestInstance.Lifecycle.PER_CLASS)
@TestMethodOrder(MethodOrderer.OrderAnnotation.class)
public class ParallelTests {

    @Test
    @Order(1)
    void testGoogle() {
        try (Playwright playwright = Playwright.create()) {
            Browser browser = playwright.chromium().launch();
            Page page = browser.newPage();
            page.navigate("https://www.google.com");
            System.out.println("Title: " + page.title());
            browser.close();
        }
    }

    @Test
    @Order(2)
    void testBing() {
        try (Playwright playwright = Playwright.create()) {
            Browser browser = playwright.chromium().launch();
            Page page = browser.newPage();
            page.navigate("https://www.bing.com");
            System.out.println("Title: " + page.title());
            browser.close();
        }
    }
}Notes: Use Playwright (1.47.0) with JUnit 5 (junit-jupiter-api/engine 5.10.2) and maven-surefire-plugin (3.1.2). Run with Java 11+ (prefer 17/21) in Eclipse, ensure Maven Dependencies + JDK in Build Path, then execute via Run As → JUnit Test or mvn test.
Explanation:
Here we have two test cases – one for Google and one for Bing.
When you enable parallel execution in your test runner (JUnit or TestNG), both tests can run at the same time, reducing test execution time. This is especially helpful in CI/CD pipelines.
Auto-Waiting
Playwright automatically waits for elements to be ready before performing actions like clicking or typing. This reduces the need for explicit waits.
Here is an example of auto-waiting in the Java Playwright automation framework.
Auto-waiting Example
package com.playwright.demo;

import com.microsoft.playwright.*;
import com.microsoft.playwright.options.AriaRole;

public class AutoWaitExample {
    public static void main(String[] args) {
        try (Playwright playwright = Playwright.create()) {
            Browser browser = playwright.chromium().launch();
            Page page = browser.newPage();
            page.navigate("https://google.com");

            // No explicit wait needed, Playwright waits for button to be ready

            page.getByRole(AriaRole.BUTTON, new Page.GetByRoleOptions().setName("Google Search")).click();
            System.out.println("Page Title: " + page.title());
            browser.close();
        }
    }
}
Explanation:
Playwright automatically waits until the Google Search button is ready before clicking.
This means you don’t need to add Thread.sleep() or manual waits – Playwright does the waiting for you.
Network Mocking & API Testing
You can intercept network requests, mock responses, and even validate API calls within the same test flow.
Playwright N/W Mocking Example
package com.playwright.demo;

import com.microsoft.playwright.*;

public class NetworkMockExample {
    public static void main(String[] args) {
        try (Playwright playwright = Playwright.create()) {
            Browser browser = playwright.chromium().launch();
            Page page = browser.newPage();

            // Intercept API call and return a mock response
            page.route("**/api/data", route ->
                route.fulfill(new Route.FulfillOptions().setBody("{\"message\":\"Hello Mocked API!\"}"))
            );

            page.navigate("https://example.com");
            System.out.println("API mocked successfully!");

            browser.close();
        }
    }
}
Explanation:
Here we mock an API call.
If the app calls https://demo.playwright.dev/api-mocking/api/data, instead of hitting the real API, Playwright will return our fake JSON response:
{“message”:”Hello Mocked API!”}
This is useful for testing applications when APIs are slow or not ready.
Cross-Browser & Mobile Emulation
Test across Chromium, Firefox, and WebKit. You can also emulate popular devices like the iPhone 14 or the Pixel 7.
Playwright Cross-Browser & Mobile Emulation Example
package com.playwright.demo;

import com.microsoft.playwright.*;

public class CrossBrowserMobileExample {
    public static void main(String[] args) {
        try (Playwright playwright = Playwright.create()) {

            // Run in WebKit (Safari engine)
            Browser browser = playwright.webkit().launch();
            Page page = browser.newPage();
            page.navigate("https://example.com");
            System.out.println("WebKit Title: " + page.title());

            // Mobile Emulation (Pixel 7 size)
            BrowserContext context = browser.newContext(
                new Browser.NewContextOptions()
                    .setDeviceScaleFactor(2)
                    .setViewportSize(412, 915) // Pixel 7 screen size
            );

            Page mobilePage = context.newPage();
            mobilePage.navigate("https://example.com");
            System.out.println("Mobile View Title: " + mobilePage.title());

            browser.close();
        }
    }
}Explanation:
- The first part opens the site in WebKit (Safari’s browser engine).
- The second part emulates a Pixel 7 device by setting the viewport size and scale factor. This way, you can test across different browsers and devices without needing real phones.
Screenshots & Videos
Capture full-page screenshots, step-based screenshots, or even record videos of the entire test run for debugging and reporting.
Screenshots & Video Recording Example
package com.playwright.demo;

import com.microsoft.playwright.*;
import java.nio.file.Paths;

public class ScreenshotVideoExample {
    public static void main(String[] args) {
        try (Playwright playwright = Playwright.create()) {
            Browser browser = playwright.chromium().launch(
                new BrowserType.LaunchOptions().setHeadless(false)
            );

            Browser.NewContextOptions contextOptions = new Browser.NewContextOptions()
                    .setRecordVideoDir(Paths.get("videos"));
            BrowserContext context = browser.newContext(contextOptions);

            Page page = context.newPage();
            page.navigate("https://playwright.dev/");

            // Take screenshot
            page.screenshot(new Page.ScreenshotOptions()
                    .setPath(Paths.get("screenshot.png")));

            // Close context (video will be saved in "videos" folder)
            context.close();
            browser.close();
        }
    }
}
Explanation:
- This script takes a screenshot and saves it as screenshot.png.
- It also records a video of the whole test and saves it inside the videos/ folder. Screenshots and videos are very useful for debugging failed tests.
Playwright Java vs Selenium
Many beginners ask whether they should start with Selenium or Playwright for Java automation. Let’s break it down:
| Feature | Playwright Java | Selenium Java |
| Cross-browser support | Yes (Chromium, Firefox, WebKit) | Yes (All major browsers) |
| Auto-waiting | Built-in | Needs explicit waits |
| Modern locators | getByRole, getByText | Mostly XPath, CSS |
| Parallel execution | Native support | Needs setup (TestNG/JUnit) |
| API Testing | Yes | No |
| Maturity & ecosystem | Growing fast | Very mature |
If you are just starting and want modern browser automation in Java, Playwright is the better choice. However, Selenium still has a larger community and ecosystem.
Conclusion
In this Playwright Java tutorial for beginners, we covered:
- How to get started with Playwright Java setup in Eclipse and Maven.
- Writing your first Playwright test in Java and running it from Eclipse or the Command Prompt.
- Key benefits such as cross-browser testing, fast execution, and browser automation in Java.
- Advanced concepts like parallel execution, network mocking, and modern locators.
- A quick comparison of Playwright vs Selenium.
Playwright Java is quickly becoming a top choice for browser automation in Java, thanks to its reliability, speed, and developer-friendly API. If you’re new to test automation, starting with Playwright Java will give you both confidence and future-ready skills.
For teams running large Java test suites, adopting Playwright cloud based SaaS tools helps improve speed, scalability, and parallel execution.
Now it’s your turn to try Playwright testing in Java and build robust automation frameworks!