Last updated on September 24th, 2025 at 02:34 am
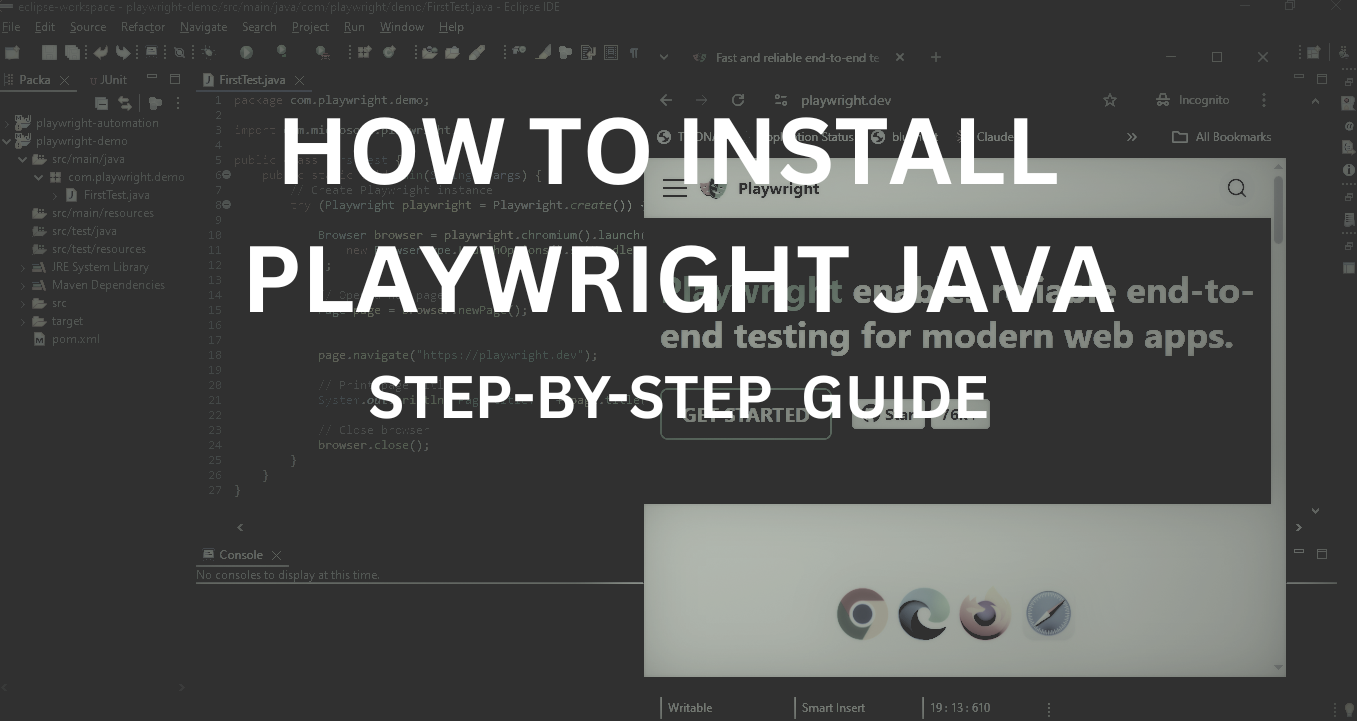
In this guide, you’ll learn exactly how to install Playwright Java latest version 1.55.0(Aug 2025) step by step. Whether you’re a beginner or an experienced tester, this Playwright Java tutorial will walk you through the entire setup process. By the end, you’ll be ready to get started with Playwright Java and run your first automated browser test.
Playwright is a modern, open-source automation framework developed by Microsoft. It is widely used for end-to-end testing because it supports multiple browsers, including Chromium, Firefox, and WebKit, along with powerful features such as auto-waiting, parallel execution, and cross-platform testing.
- Playwright Java Installation Guide
- What's Next?
- Conclusion
Playwright Java Installation Guide
Follow the steps below to set up the Playwright end-to-end testing framework with Java.
Prerequisites for Playwright Java Setup
Before you begin the installation, ensure that you have the following Playwright Java prerequisites in place. Setting up the right environment ensures that the installation process goes smoothly and avoids compatibility issues later. Let’s look at the required tools:
Java Development Kit (JDK)
Playwright for Java requires a supported version of the JDK. It is recommended to install Java 8 or higher (Java 11 and above is commonly used in most projects).
Integrated Development Environment (IDE)
While you can technically use any text editor, working with an IDE makes the Playwright Java setup much easier. Popular choices include:
- IntelliJ IDEA: Widely used for Java development with excellent Maven/Gradle integration.
- Eclipse: A free, open-source IDE suitable for large-scale Java projects.
- Visual Studio Code (VS Code): Lightweight and flexible with Java extensions.
You can use any one from the above list. In this guide, we’ll use Eclipse as the IDE to write and run Playwright tests with Java.
Build Tool: Maven or Gradle
Playwright for Java is distributed as a Maven/Gradle dependency, so you need a build tool to manage dependencies and project structure.
- Maven: The most common choice for Java projects, with easy dependency management.
- Gradle: Another option, often used for faster builds and flexible project configurations.
I personally prefer Maven, so in our Playwright Java project, we’ll use it to manage dependencies and efficiently build the framework.
Having these prerequisites in place ensures a smooth Playwright Java setup and gets your environment ready for installing dependencies and writing your first test.
Installing Java for Playwright
The first step to install Playwright Java is setting up the Java Development Kit (JDK), since Playwright runs on top of Java. Without JDK, you won’t be able to compile or run your Playwright tests.
Download the JDK
- Go to the official Oracle JDK or OpenJDK website.
- Choose the latest LTS (Long-Term Support) version, such as Java 11 or Java 17, as these are most stable for automation projects.
- Download the installer for your operating system (Windows, macOS, or Linux).
Install the JDK
- Run the installer and follow the on-screen instructions.
- During installation, make sure the JDK is added to your system PATH so it can be accessed from the command line.
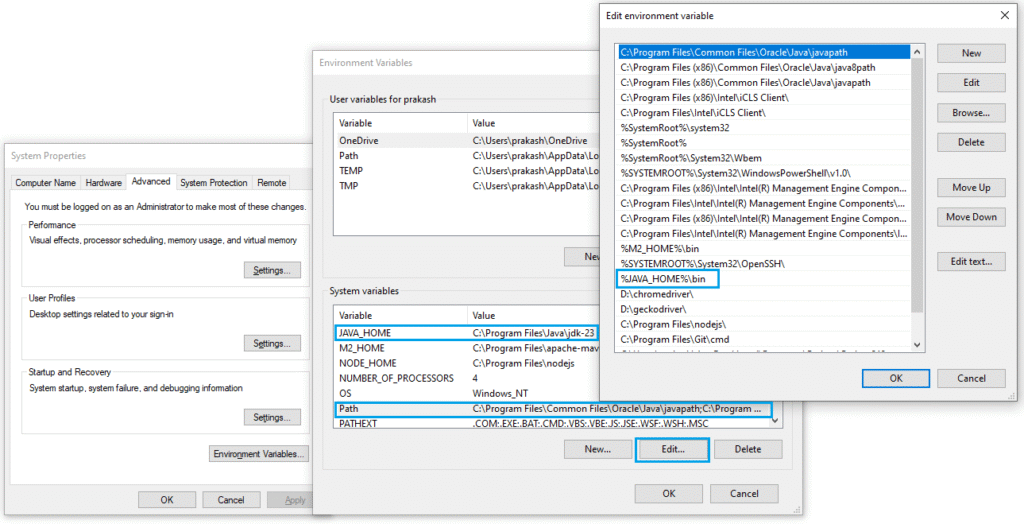
Set the JAVA_HOME Environment variable
Setting the JAVA_HOME environment variable is important because it points to the location of the Java Development Kit (JDK), allowing applications and build tools to find and use it correctly.
- In the Windows Start menu, search for “Advanced system settings” and then select View advanced system settings. This will open the System Properties dialog box.
- Go to the Advanced tab and click on the Environment Variables button. This will open the Environment Variables dialog box.
- Click on the New button to create a system variable named JAVA_HOME and set its value to your Java installation path (e.g., C:\Program Files\Java\jdk-23).
- Edit the Path system variable, add a new entry, and set it to %JAVA_HOME%\bin.
- Click the OK button to close all dialog boxes and save the changes.
Verify Java Installation
Once installed, open a terminal or command prompt and type:
java -versionIf installed correctly, you should see the Java version details displayed. For example:
java version "23.0.2" 2025-01-21
Java(TM) SE Runtime Environment (build 23.0.2+7-58)
Java HotSpot(TM) 64-Bit Server VM (build 23.0.2+7-58, mixed mode, sharing)
Download and Install Maven
Before creating your first Playwright project, you need a build tool to manage dependencies. Maven is the most commonly used tool for Java projects and is strongly recommended for Playwright Java setup.
Download Maven
- Visit the official Apache Maven download page
- Choose the latest stable release (for example, apache-maven-3.x.x).
- Download the binary zip file for your operating system.
Install Maven
- Extract the downloaded archive to a directory on your system (e.g., C:\Program Files\Apache\Maven on Windows or /usr/local/apache-maven on Linux/Mac).
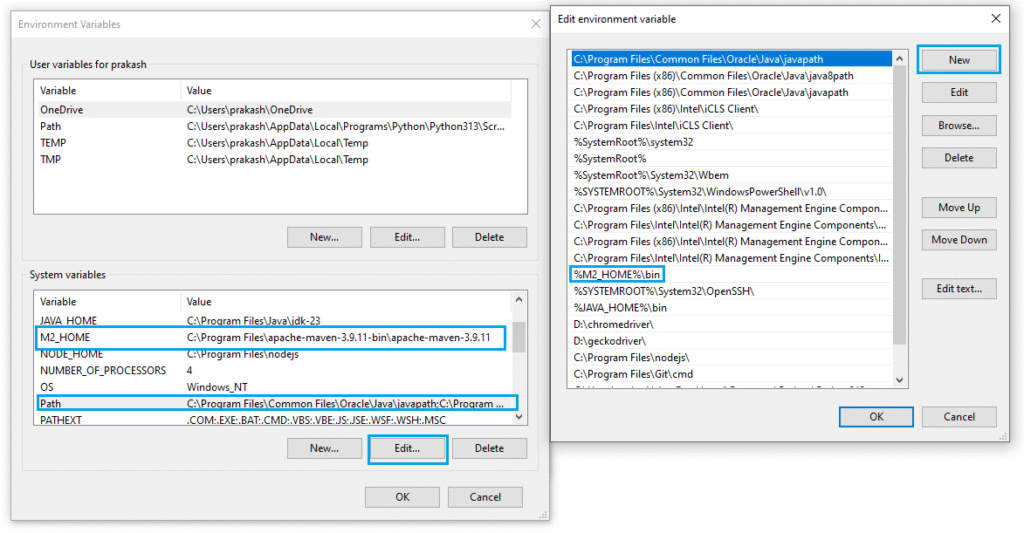
Set the M2_HOME Environment Variable
Add the Maven bin folder to your system PATH environment variable so you can use the mvn command globally.
Verify Maven Installation
To confirm Maven is installed, open a terminal and run:
mvn -versionYou should see output similar to:
Apache Maven 3.9.11 (3e54c93a704957b63ee3494413a2b544fd3d825b)
Maven home: C:\Program Files\apache-maven-3.9.11-bin\apache-maven-3.9.11
Java version: 23.0.2, vendor: Oracle Corporation, runtime: C:\Program Files\Java\jdk-23
Default locale: en_US, platform encoding: UTF-8
OS name: "windows 10", version: "10.0", arch: "amd64", family: "windows"
With Maven successfully installed, your environment is ready for the next step.
Install Eclipse IDE
Eclipse is a free development tool that makes it simple to build Java applications from scratch. Using an IDE like Eclipse makes the process simple and beginner-friendly.
You can download the latest version of Eclipse IDE from its official website and install it on your system.
Setting Up a Maven Project for Playwright Java
Once Java and Maven are installed, the next step in your Playwright Java project setup is to create a Maven project in the Eclipse IDE.
Create a New Maven Project in Eclipse
- Open the Eclipse IDE.
- Go to File > New > Maven Project.
- Select Create a simple project (skip archetype selection) or choose maven-archetype-quickstart if you prefer a basic Java project structure.
- Fill in the required details:
- Group ID: usually your company or project domain (e.g., org.example).
- Artifact ID: your project name (e.g., playwright-demo).
- Version: default is fine (0.0.1-SNAPSHOT).
- Click Finish.
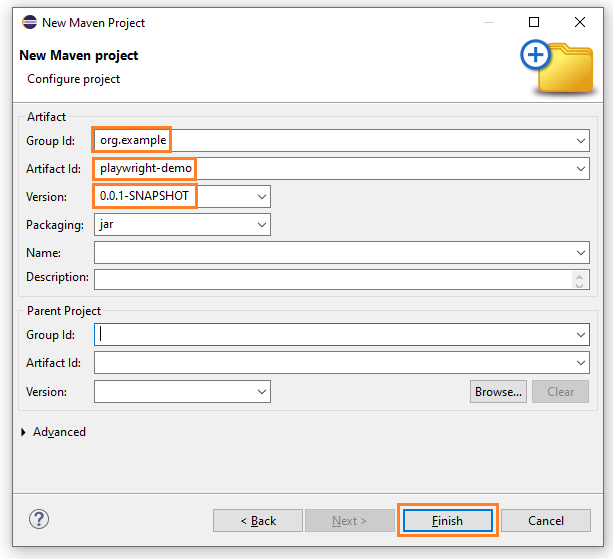
Eclipse will generate a new Maven project with a default folder structure.
Maven Project Structure
A standard Maven project created in Eclipse will look like this:
playwright-demo
│── src
│   ├── main
│   │   └── java   -> main application code
│   └── test
│       └── java   -> test classes
│── pom.xml -> project configuration and dependencies- src/main/java: Place application or utility code here.
- src/test/java: Place your Playwright test classes here.
- pom.xml: The most important file, used to add Playwright Java Maven dependencies and plugins.
With this Playwright Java Maven project created, you’re now ready to add the Playwright dependency in the pom.xml file and start building your first automated test.
Add Dependencies: Install Playwright Java
After creating your Maven project, the next step is to add the required Playwright Java dependencies. This is done by updating the pom.xml file. Maven will then automatically download Playwright and its transitive dependencies for you.
Add Playwright Dependency in pom.xml
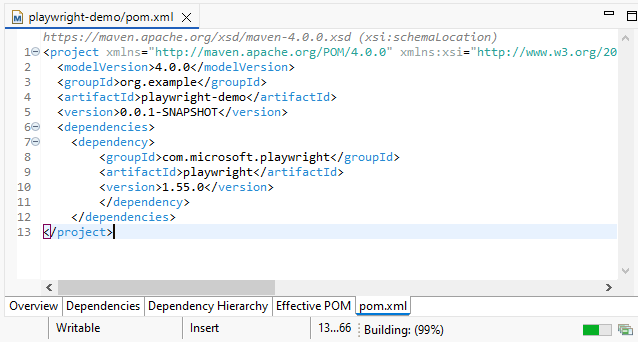
Open the pom.xml file in your project and add the following inside the section:
<dependency>
    <groupId>com.microsoft.playwright</groupId>
    <artifactId>playwright</artifactId>
    <version>1.55.0</version>
</dependency>
This instructs Maven to fetch the latest Playwright library version 1.55.0 (released in August 2025) during the project build. It will automatically download and install all required Playwright Java dependencies.
Check for the Latest Version
Playwright releases updates frequently. To configure Playwright Java with the most recent version:
- Visit the official Playwright Java documentation
- Or check the Maven Central Repository
Make sure to replace 1.55.0 with the latest available version to take advantage of new features and fixes.
Once saved, Maven will download the required Playwright Java dependencies during the next build, making your project ready for writing and executing tests.
Writing and Running Your First Playwright Test in Java
Now that your project is set up, let’s move on to the exciting part of this Playwright Java tutorial, writing your first test. This example will show you how to launch a browser, open a webpage, and print its title to the console.
Create a Sample App.java File
Inside the src/main/java folder of your project, add a new class named FirstTest.java under the package com.playwright.demo.
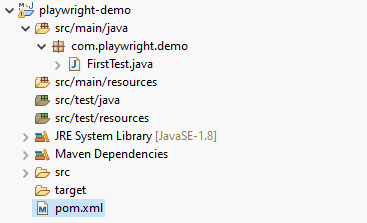
Paste the following Playwright example test code in FirstTest.java.
package com.playwright.demo;

import com.microsoft.playwright.*;

public class FirstTest {
    public static void main(String[] args) {
        // Create Playwright instance
        try (Playwright playwright = Playwright.create()) {
            // Launch a Chromium browser
            Browser browser = playwright.chromium().launch(
                new BrowserType.LaunchOptions().setHeadless(false) // set true for headless
            );

            // Open a new page
            Page page = browser.newPage();

            // Navigate to Playwright website
            page.navigate("https://playwright.dev");

            // Print page title
            System.out.println("Page title: " + page.title());

            // Close browser
            browser.close();
        }
    }
}
Run Playwright Test with Maven
To execute your Playwright test file FirstTest.java, from the command prompt using Maven:
- Open the command prompt and navigate to your project’s root directory (the location where the pom.xml file is present).
- Run the following command:
mvn compile exec:java -Dexec.mainClass="com.playwright.demo.FirstTest"On the first run, Playwright will also download the required browser binaries automatically. Once execution completes, you should see a browser window open, navigate to the Playwright website, and print the page title in the console.
Alternatively, you can run your test directly from Eclipse:
- Right-click on FirstTest.java.
- Select Run As > Java Application.

With this, you’ve successfully written and executed your first Playwright script in Java. You are now ready to get started with Playwright Java for building more advanced automation tests.
What’s Next?
Now that you have successfully installed Playwright with Java, the next step is learning how to record tests in Playwright Java. Check out this detailed guide on how to record tests in Playwright Java to get started.
If you are new to Playwright Java, you can also explore this beginner-friendly Playwright Java guide to build a strong foundation.
Conclusion
In this guide, we walked through all the essential steps to install Playwright Java. You started by setting up the prerequisites, such as the JDK, an IDE, and Maven (or Gradle). Then you learned how to create a Maven project, add the Playwright dependency, and structure your project for automation testing. Finally, we wrote and executed a sample test to confirm the setup works correctly.
By following this step-by-step Playwright Java installation guide, you now have a complete environment ready for building and running browser automation tests. With the correct configuration in place, your Playwright Java setup will be smooth and reliable, enabling you to focus on writing effective automated tests.
